Posted in Being Healthy, coeliac friendly, Cooking, corn free, dairy free, diabetes, diabetic friendly, gluten free, low carb, nut free

Middle Eastern Chicken and Potato Dupe

While doom scrolling one night, I came across this recipe video for Middle Eastern Chicken and Potato one pot bake. Mmmm, mm – now that’s my kind of dinner inspiration.

plated vision

The Things I Like and Will Use

One pot – while the video shows using a pot that is commonly used when starting a meal on the stove and then finishing in the oven, there’s no reason you can’t or shouldn’t use a sheet pan or standard baking dish.

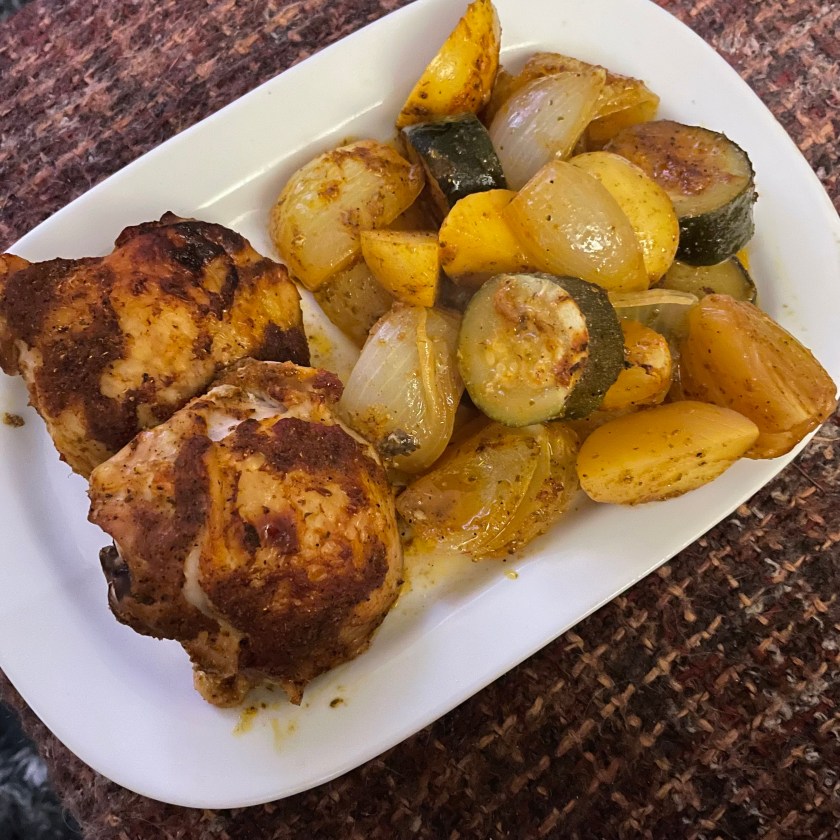
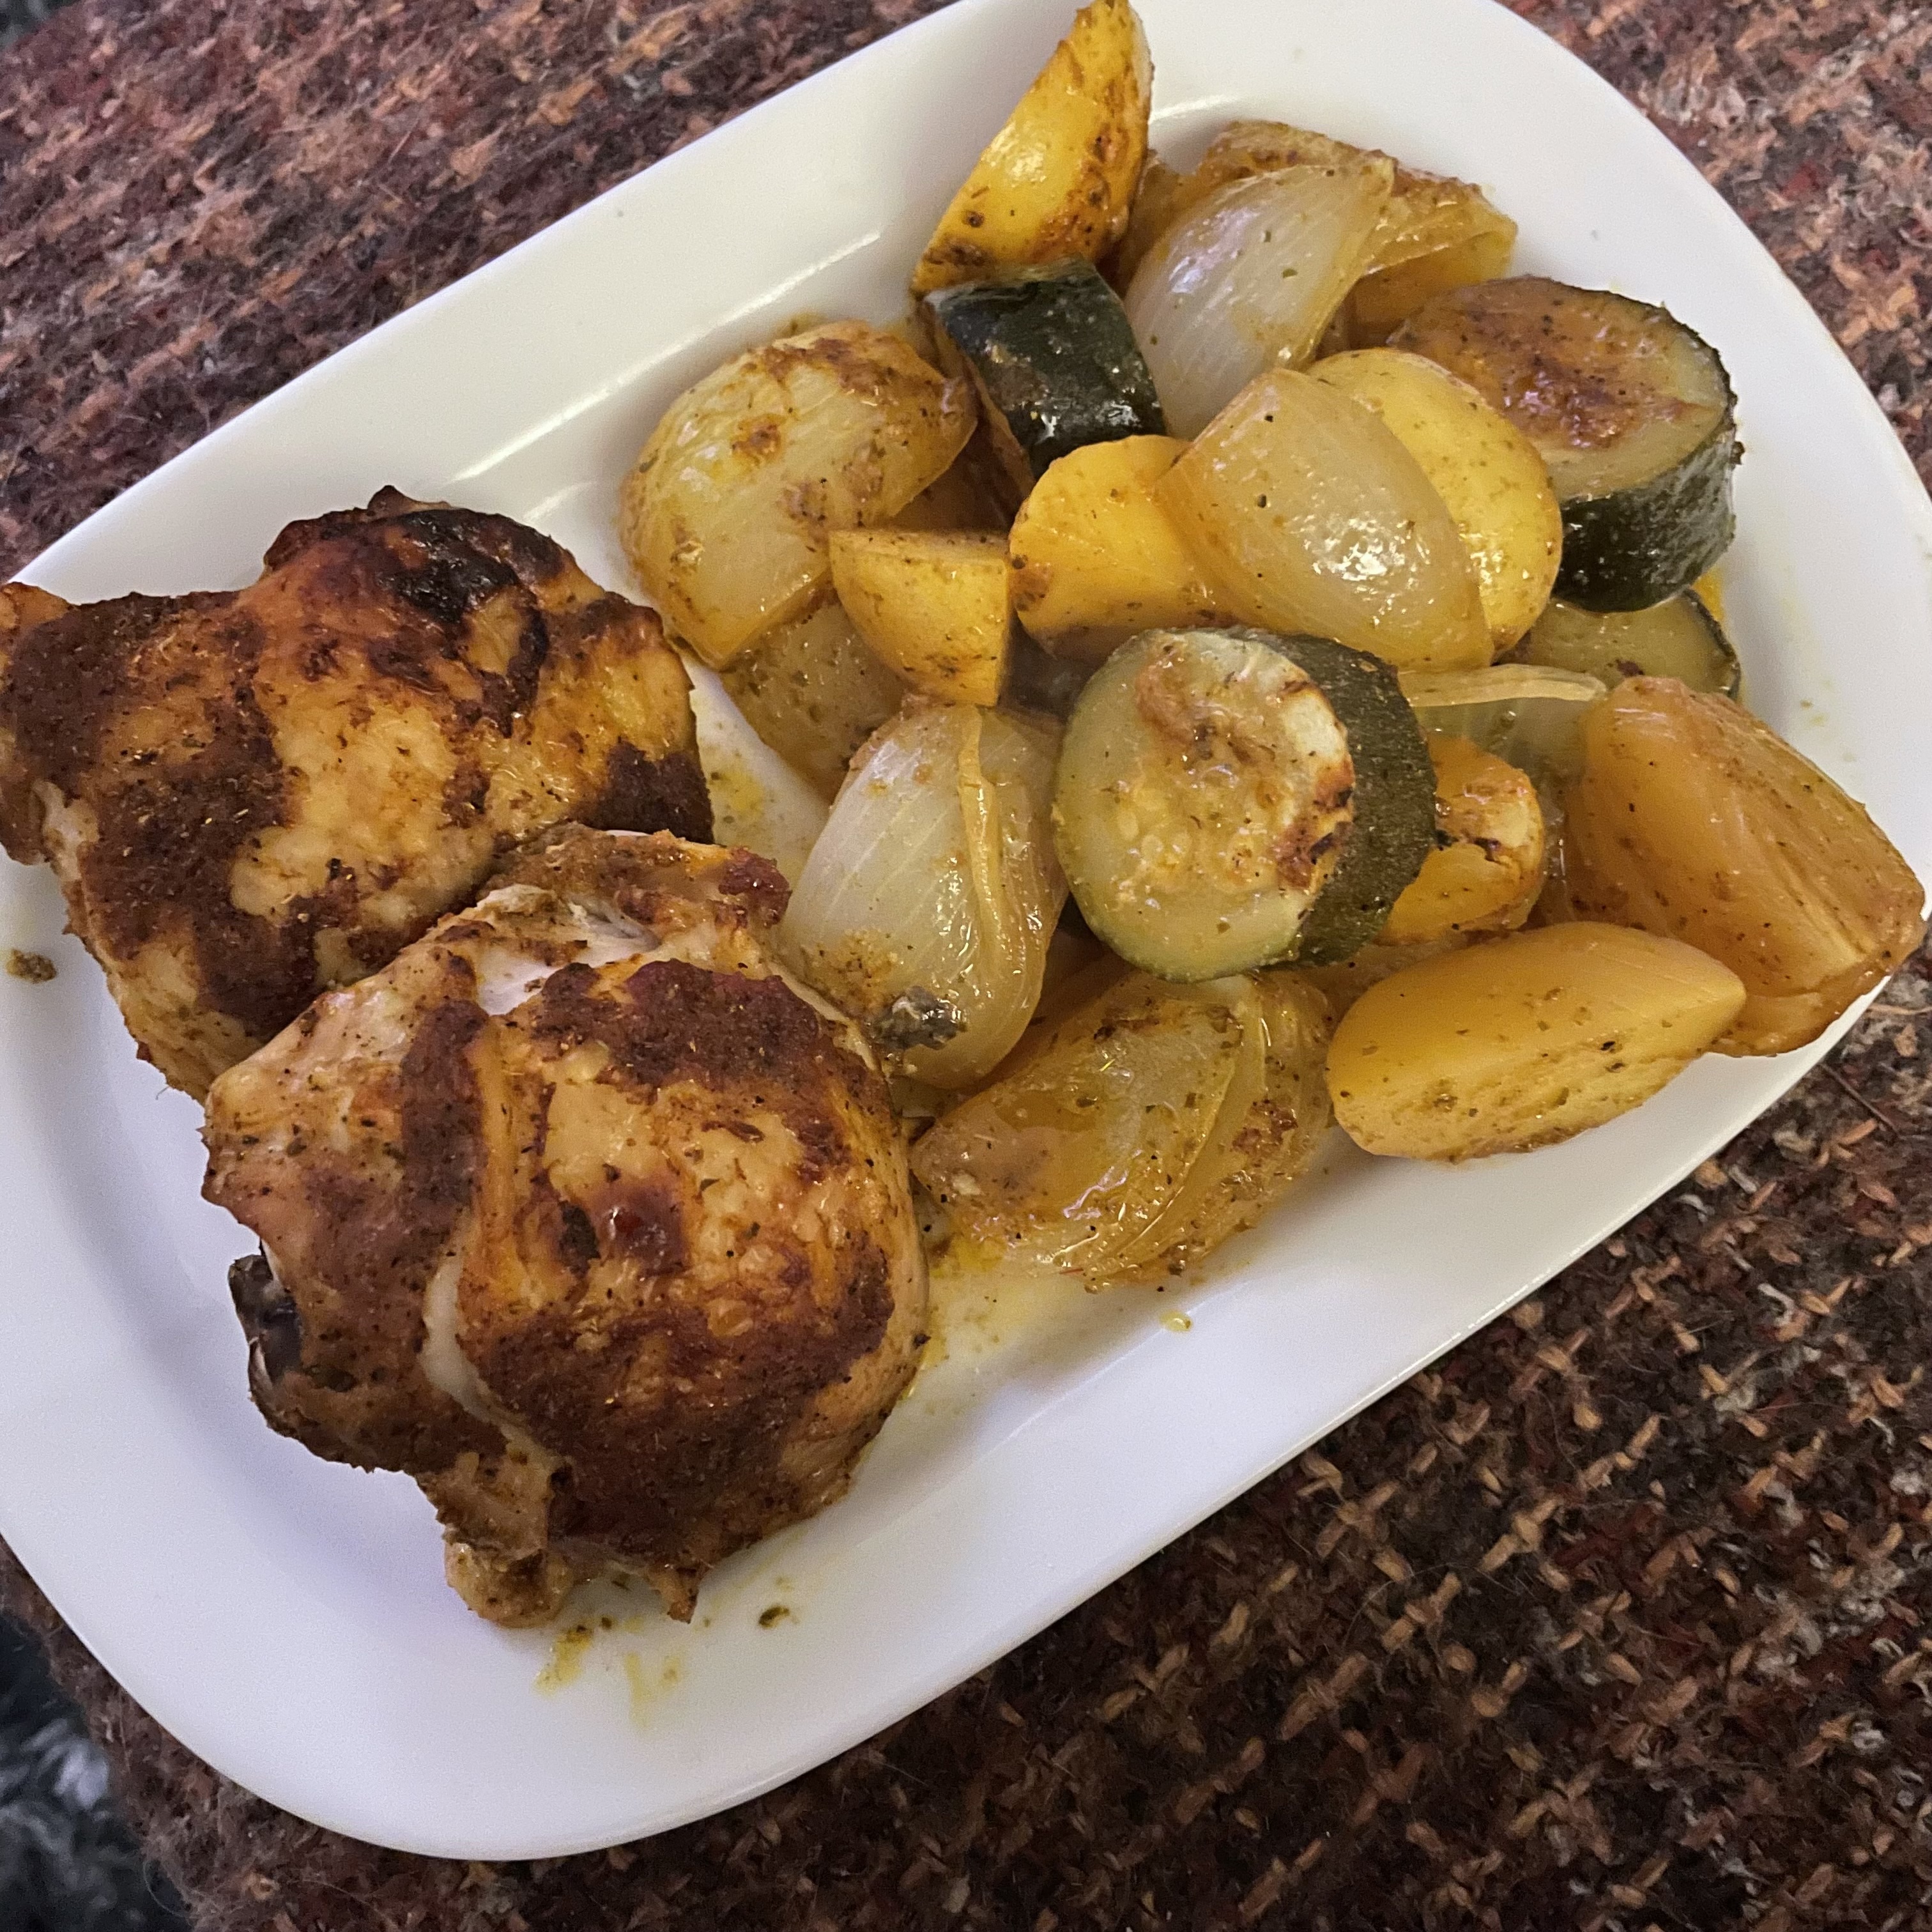
Chicken thighs – bone in with the skin – this is my favorite piece of chicken to cook with. The little extra fat keeps it juicy while cooking and adds that little bit of extra flavor you just can’t get from a chicken breast.

Covered and uncovered cooking. When cooking meat with the bone in, it can be hard to confidently cook it through, so cooking covered – foil or lid – is an excellent way to achieve this. And then the shorter uncovered time is for crisping up the skin so if you are eating that (and you don’t have to), it’s a delightfully crispy crunch.

The Things I’ll Take Inspiration From and Why

Now, I love the idea and all of the individual and collective flavors of this dish, but I find myself on a tighter food budget these days. So here’s how I’m making this work with what’s in my pantry.

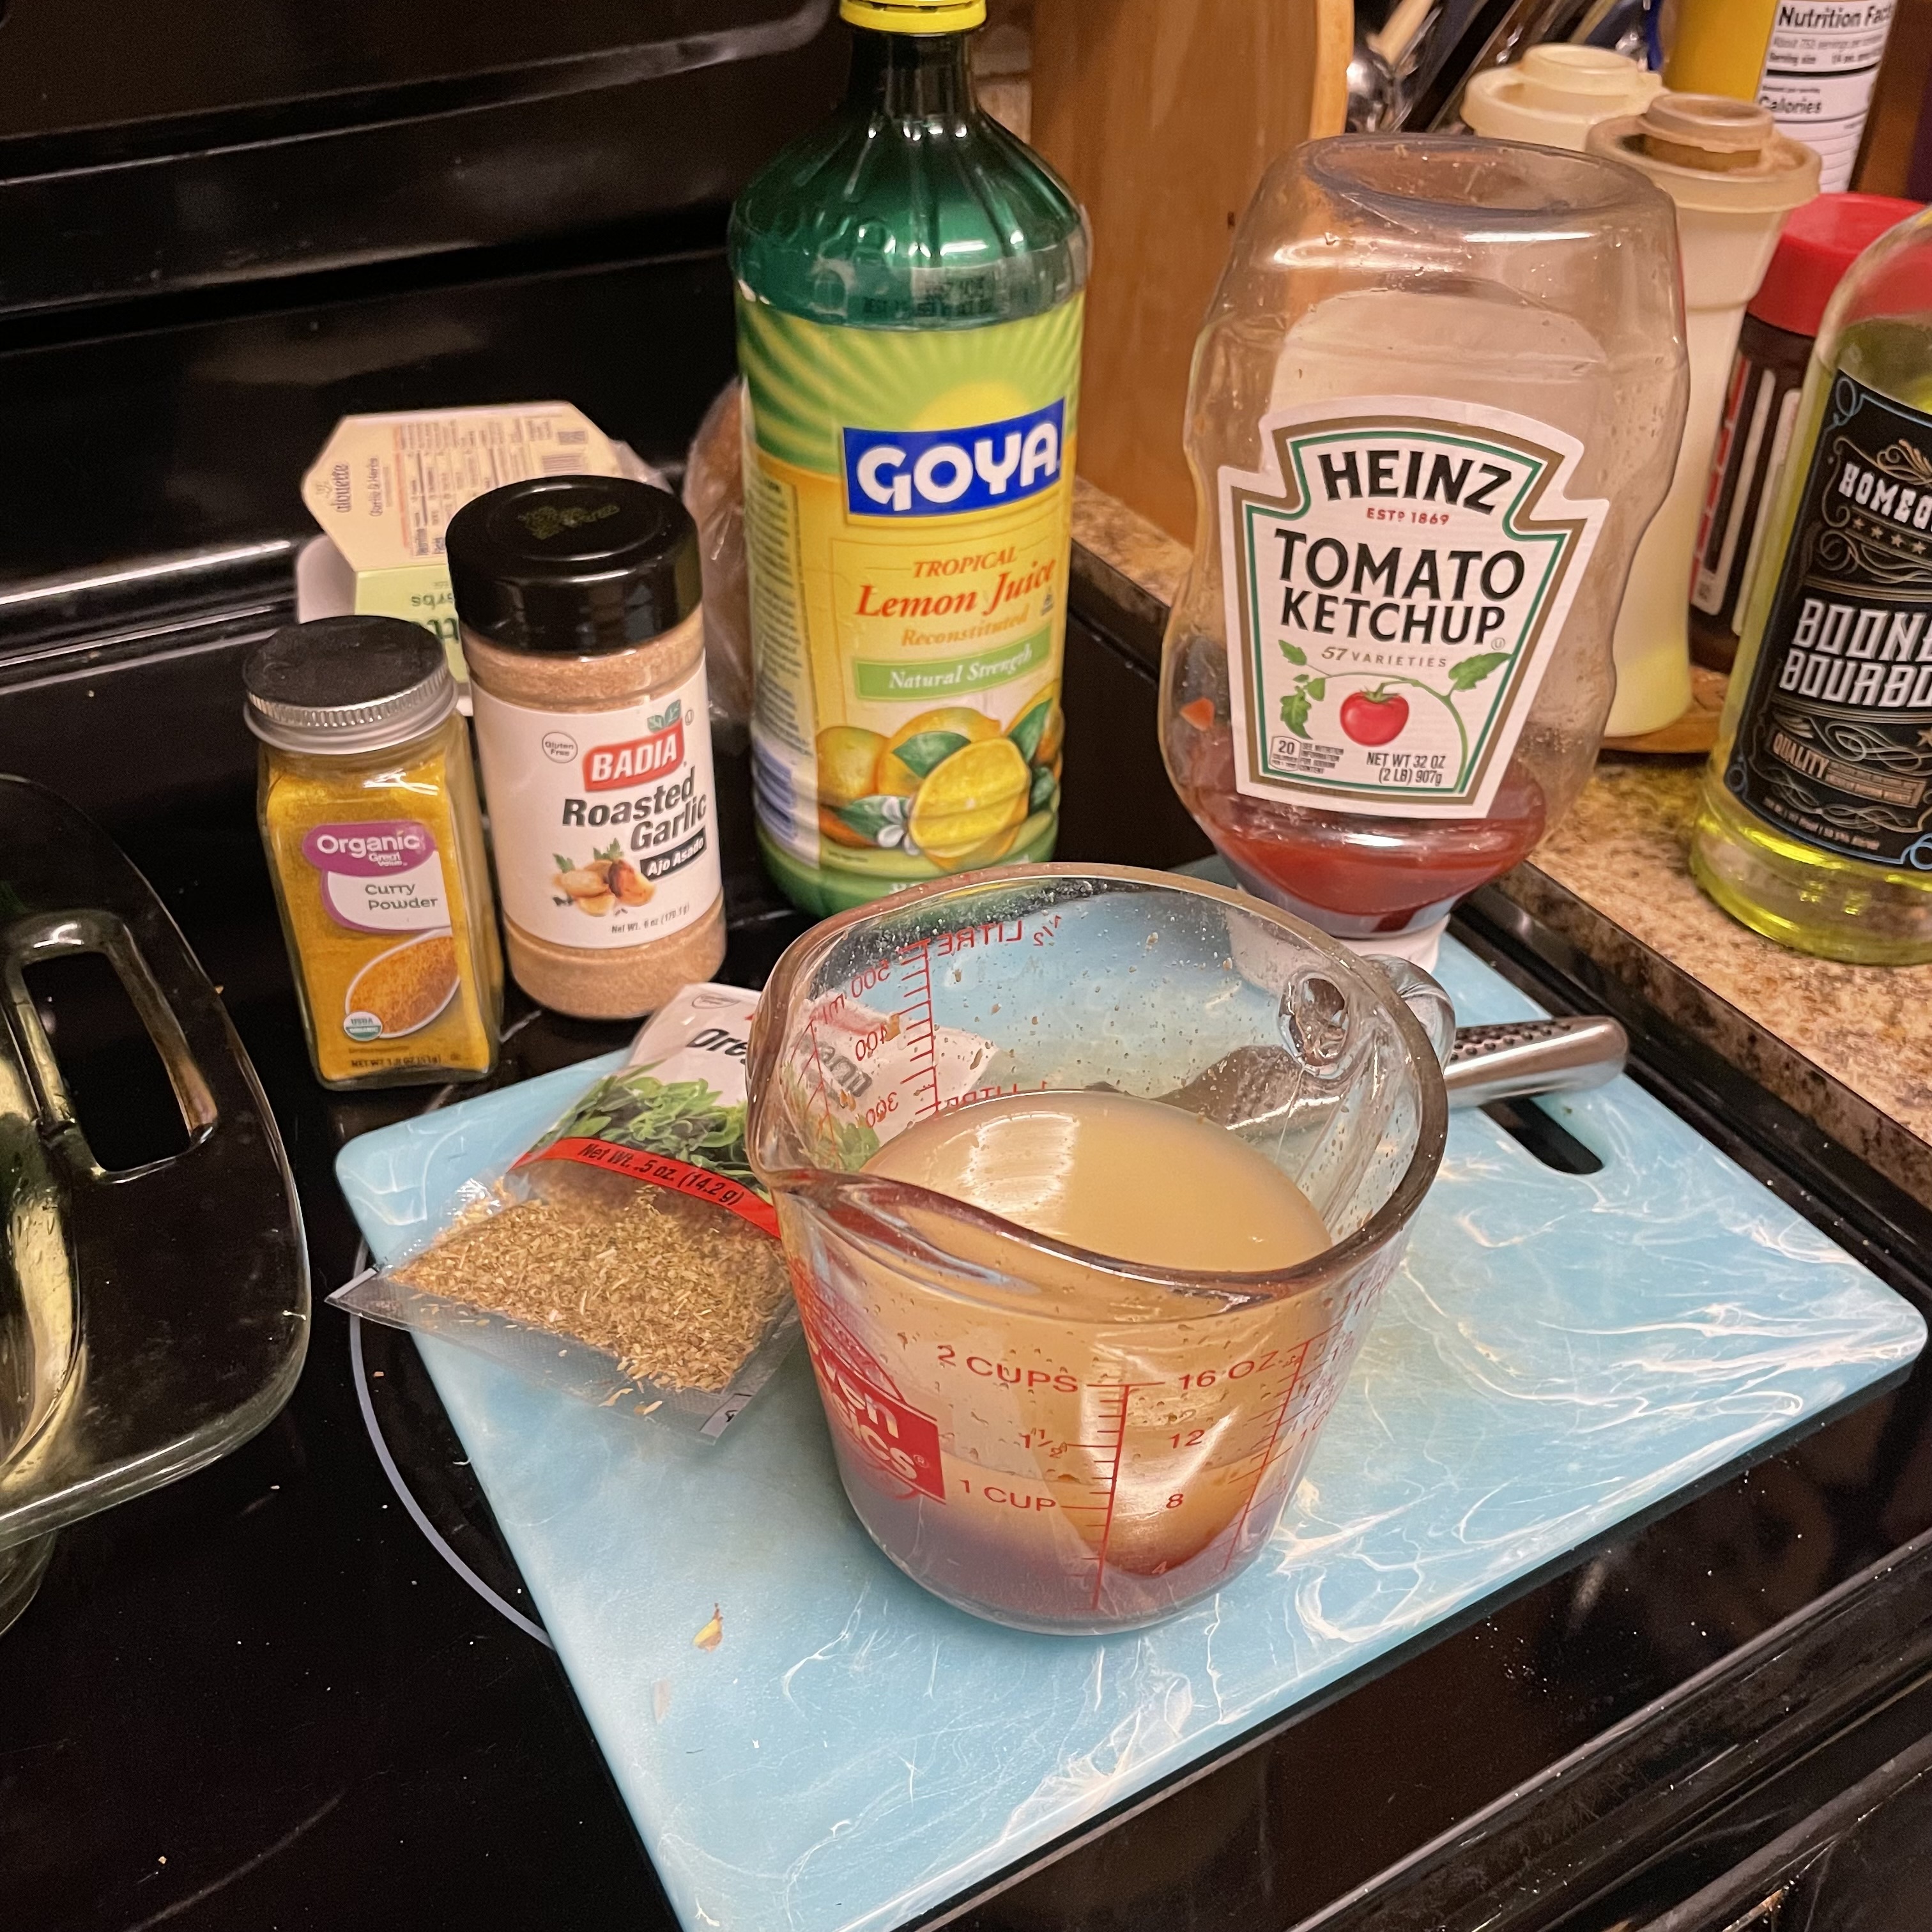
Lemon – rather than rely on fresh lemons and their rising cost from tariffs, I keep a bottle of lemon juice in the fridge. It’s controversial with professional chefs, but it’s far more versatile and I don’t have to worry about it going bad or drying out.

And as it happens, I also just bought a ton of Greek lemon infused olive oil, so I’ll also be prepping the baking dish with this lemon oil to contribute to the dish as well.

Tomato paste – I don’t cook anything that uses tomato paste – not even marinara. So I never have this ingredient in the house. What do I have? Ketchup. So tonight, the “sauce” base is ketchup.

Aleppo pepper – that’s a pretty specific spice that’s not part of my pantry, but in the spirit of peppers with and without heat, I have lots of others. For this, I added a squeeze of Sriracha for just a hint of heat and smoked paprika for the smokiness from dried pepper.

Cumin – so I definitely have cumin, but I was feeling more curry, so I switched. That simple – followed what my palate was more interest in.

Carbs – so this dish as shown in the video is pretty high carb and not at all diabetic friendly, so I made some simple additions and one subtraction to balance this out:

  • removed rice – because rice is my least favorite carb
  • added quartered onions
  • added chunks of zucchini

Both the onion and zucchini are highly traditional additions to meals from countries and cultures east of the Mediterranean to the Indian Ocean and to the Pacific.

Side Note on the Term “Middle Eastern”

I’m nearing my 50th birthday as I make this dinner, and I recall a video excerpt I found earlier this week that challenged the terms “middle East” and “far East” as colonial, and therefore, oppressive terms. Yes, I agree, and I wanted to bring your attention to this. You see, the words “middle” and “east” only have meaning when we know the origin point – middle compared to what? east compared to what fixed point. In this case – it’s London – the center of the British colonial empire.

In that paradigm, then, “East” refers to everything east of the Mediterranean to the Pacific ocean, the middle of which is the Arabic and Indian countries and cultures and the “far” of which is the aggregate of the Asian cultures.

I offer these as generalized geographic assignments for the colonial “Middle East”:

  • Western Asia
  • Southwest Asia
  • West Asia and North Africa (WANA)

I offer these as generalized geographic assignments for the colonial “Far East”:

  • East Asia
  • Pacific Asia
  • Northeast Asia – Korea, Japan, northern China
  • Southeast Asia – Vietnam, Thailand, Indonesia

I offer these as generalized geographic assignments for the colonial “Indian subcontinent”:

  • South Asia
  • The subcontinent

I offer these as generalized geographic assignments for Arabic-speaking regions

  • Arab world or Arab states
  • North Africa and Arabian Peninsula

These alternatives focus on the geography relative to the region itself rather that in comparison with a conquering or colonial empire center.

One of the obvious challenges to Westerners is that our sense of world geography is likely to confound most in correcting our terminology. Beyond that, these terms have been assigned cultural meaning as well that may not align with the geographic/continental mapping, where a term like “Middle Eastern” is generalize to Arabic speaking countries regardless of their geographic location, and likewise “Far East” to a reductive understanding of Asian to refer to those of Chinese, Japanese, Thai, Vietnamese, Korea, and Indonesian descent.

This discussion deserves far more exploration, so thank you for not skimming just to get to more details about the recipe.

The Ingredients

In the recommended order of preparing (to make it easy to assemble):

  • 8 tiny golden creamer potatoes, quartered (or 4 medium or 2 large)
  • 3-4 small yellow or white onions, peeled and quartered
  • 2 medium zucchinis, cut into 1-inch thick “slices” or round chunks
  • 1/2 cup ketchup (or the tomato and pepper paste combo from the original recipe)
  • 1/2 lemon juice (bottle or fresh squeezed)
  • 1T Sriracha (or 1T Aleppo pepper from the original recipe)
  • 1T curry (or cumin from the original recipe)
  • 1T garlic powder (or 4-5 fresh cloves minced)
  • 1T oregano
  • 2t salt
  • 1t pepper
  • 4-6 chicken thighs, bone in with skin (or breasts or leg quarters)

The Assembly Process

Here’s how to layer it all into your baking dish.

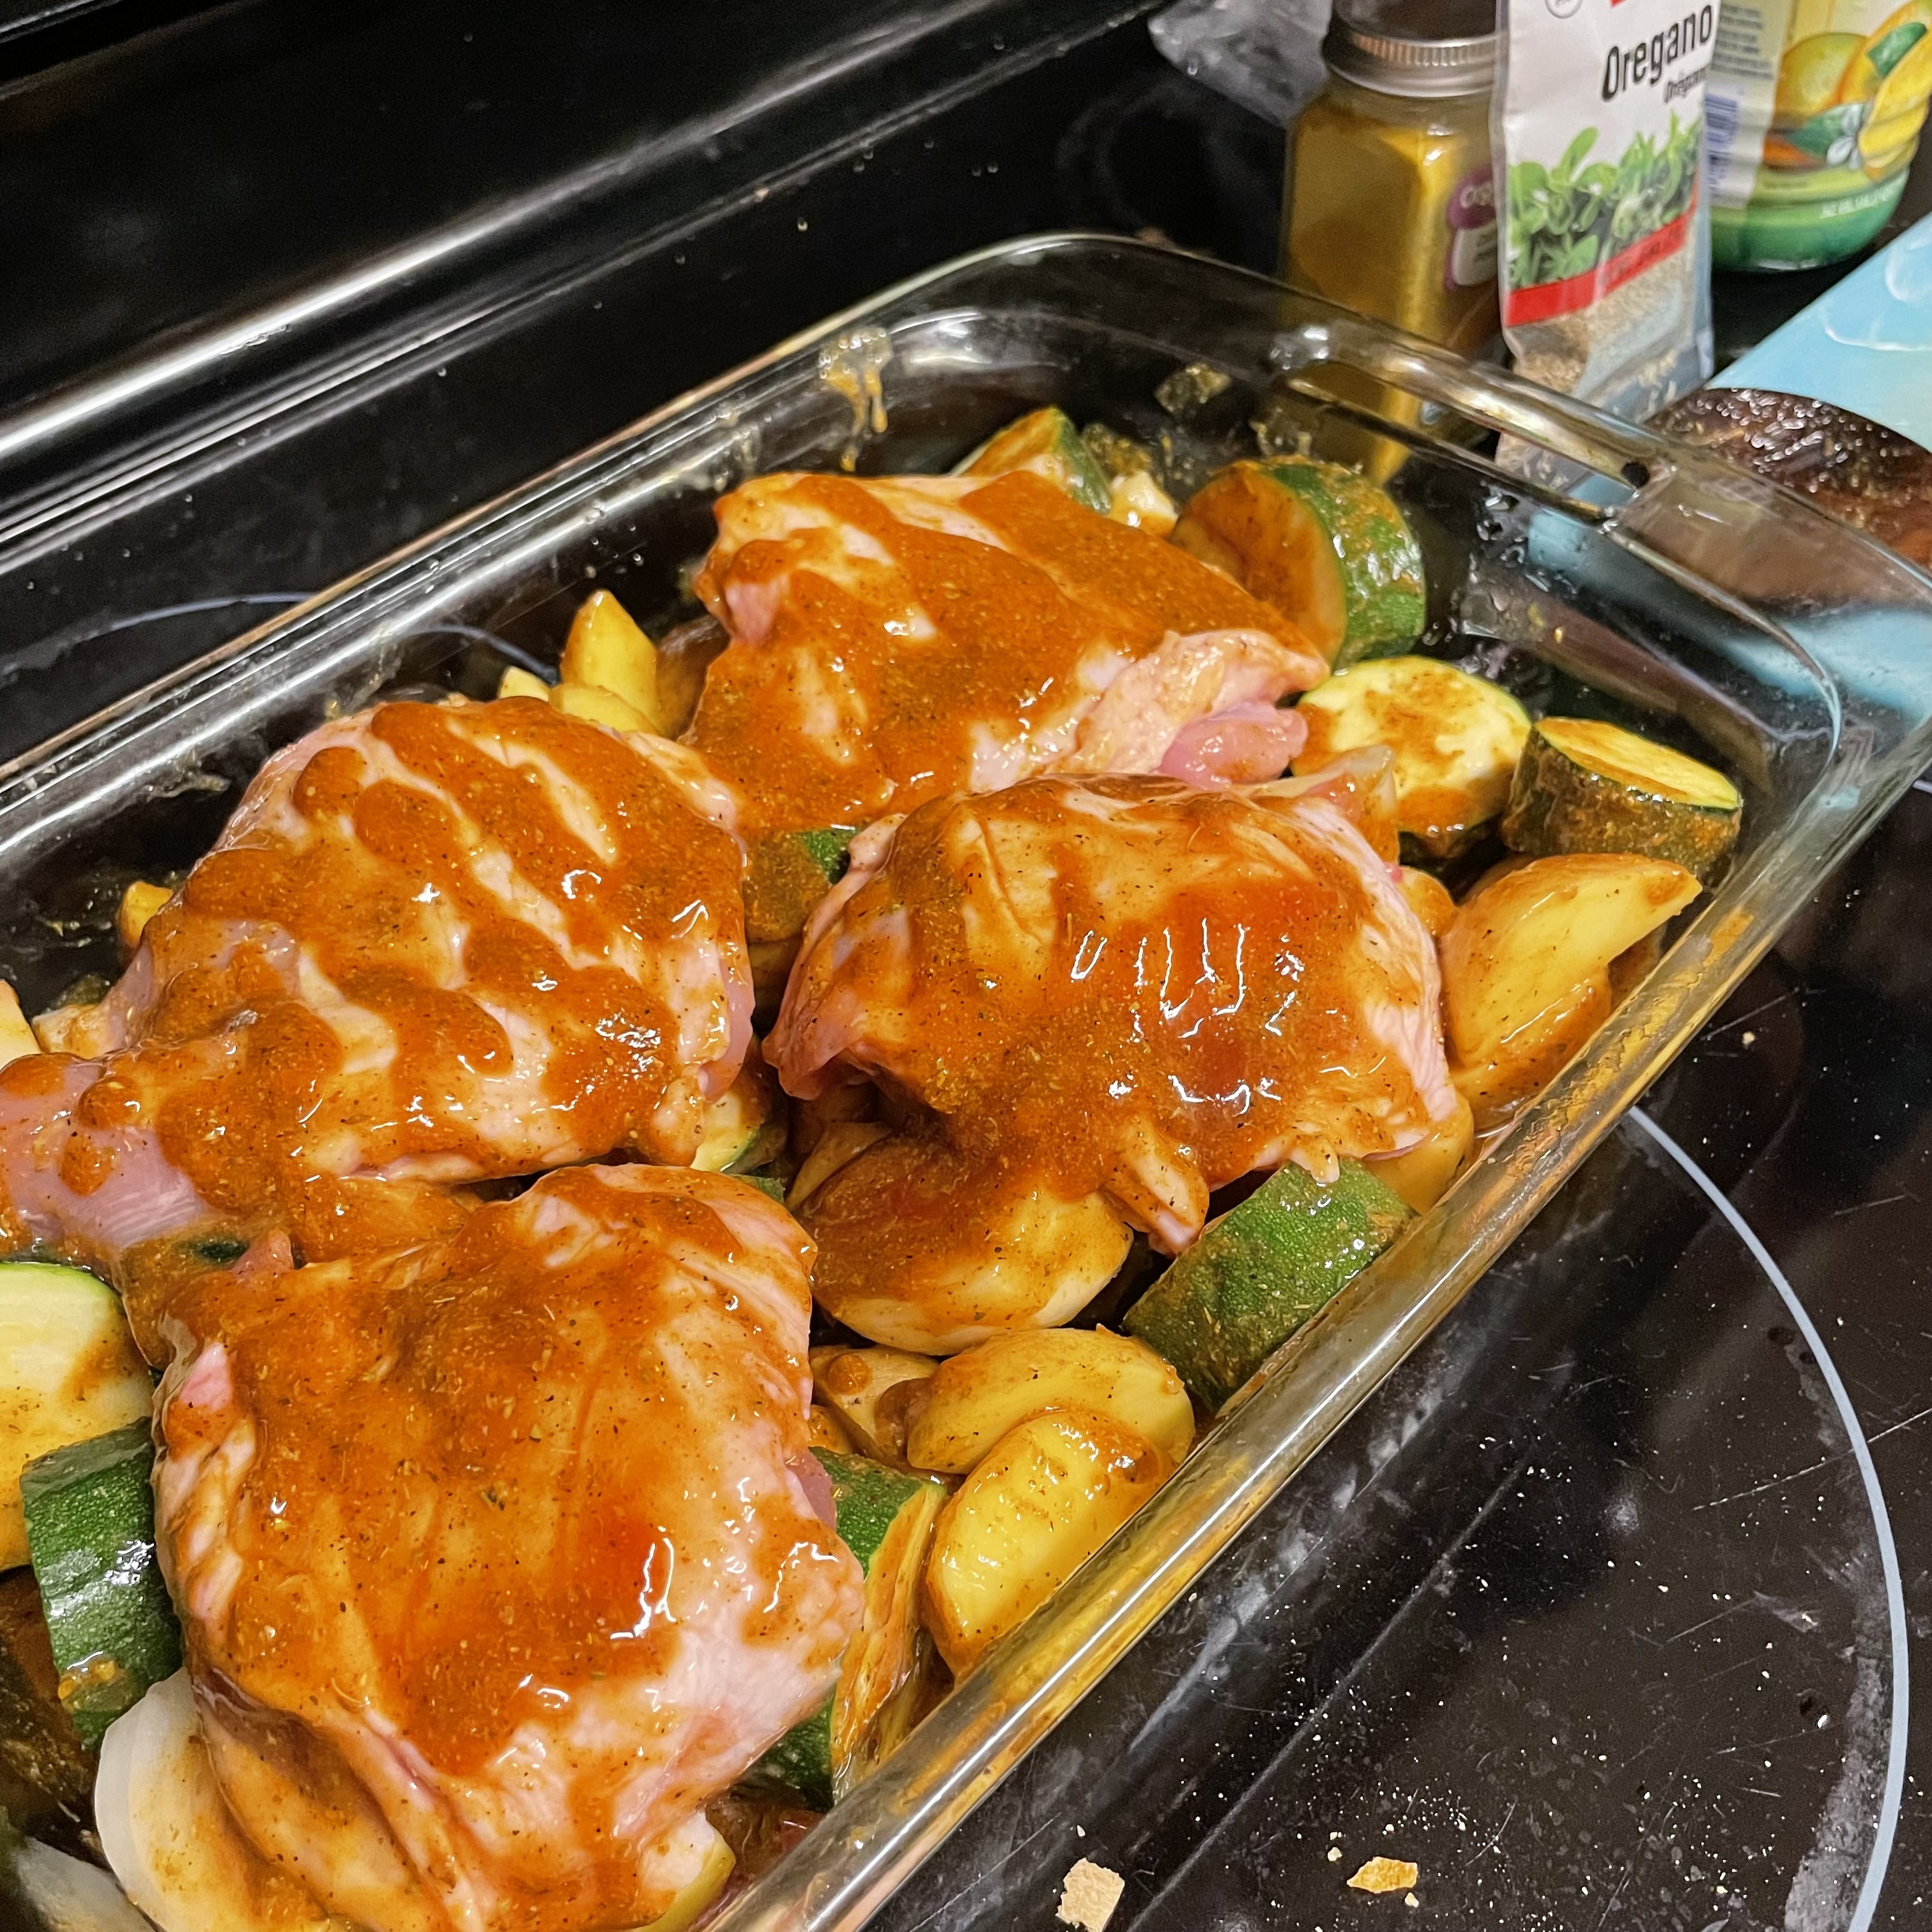
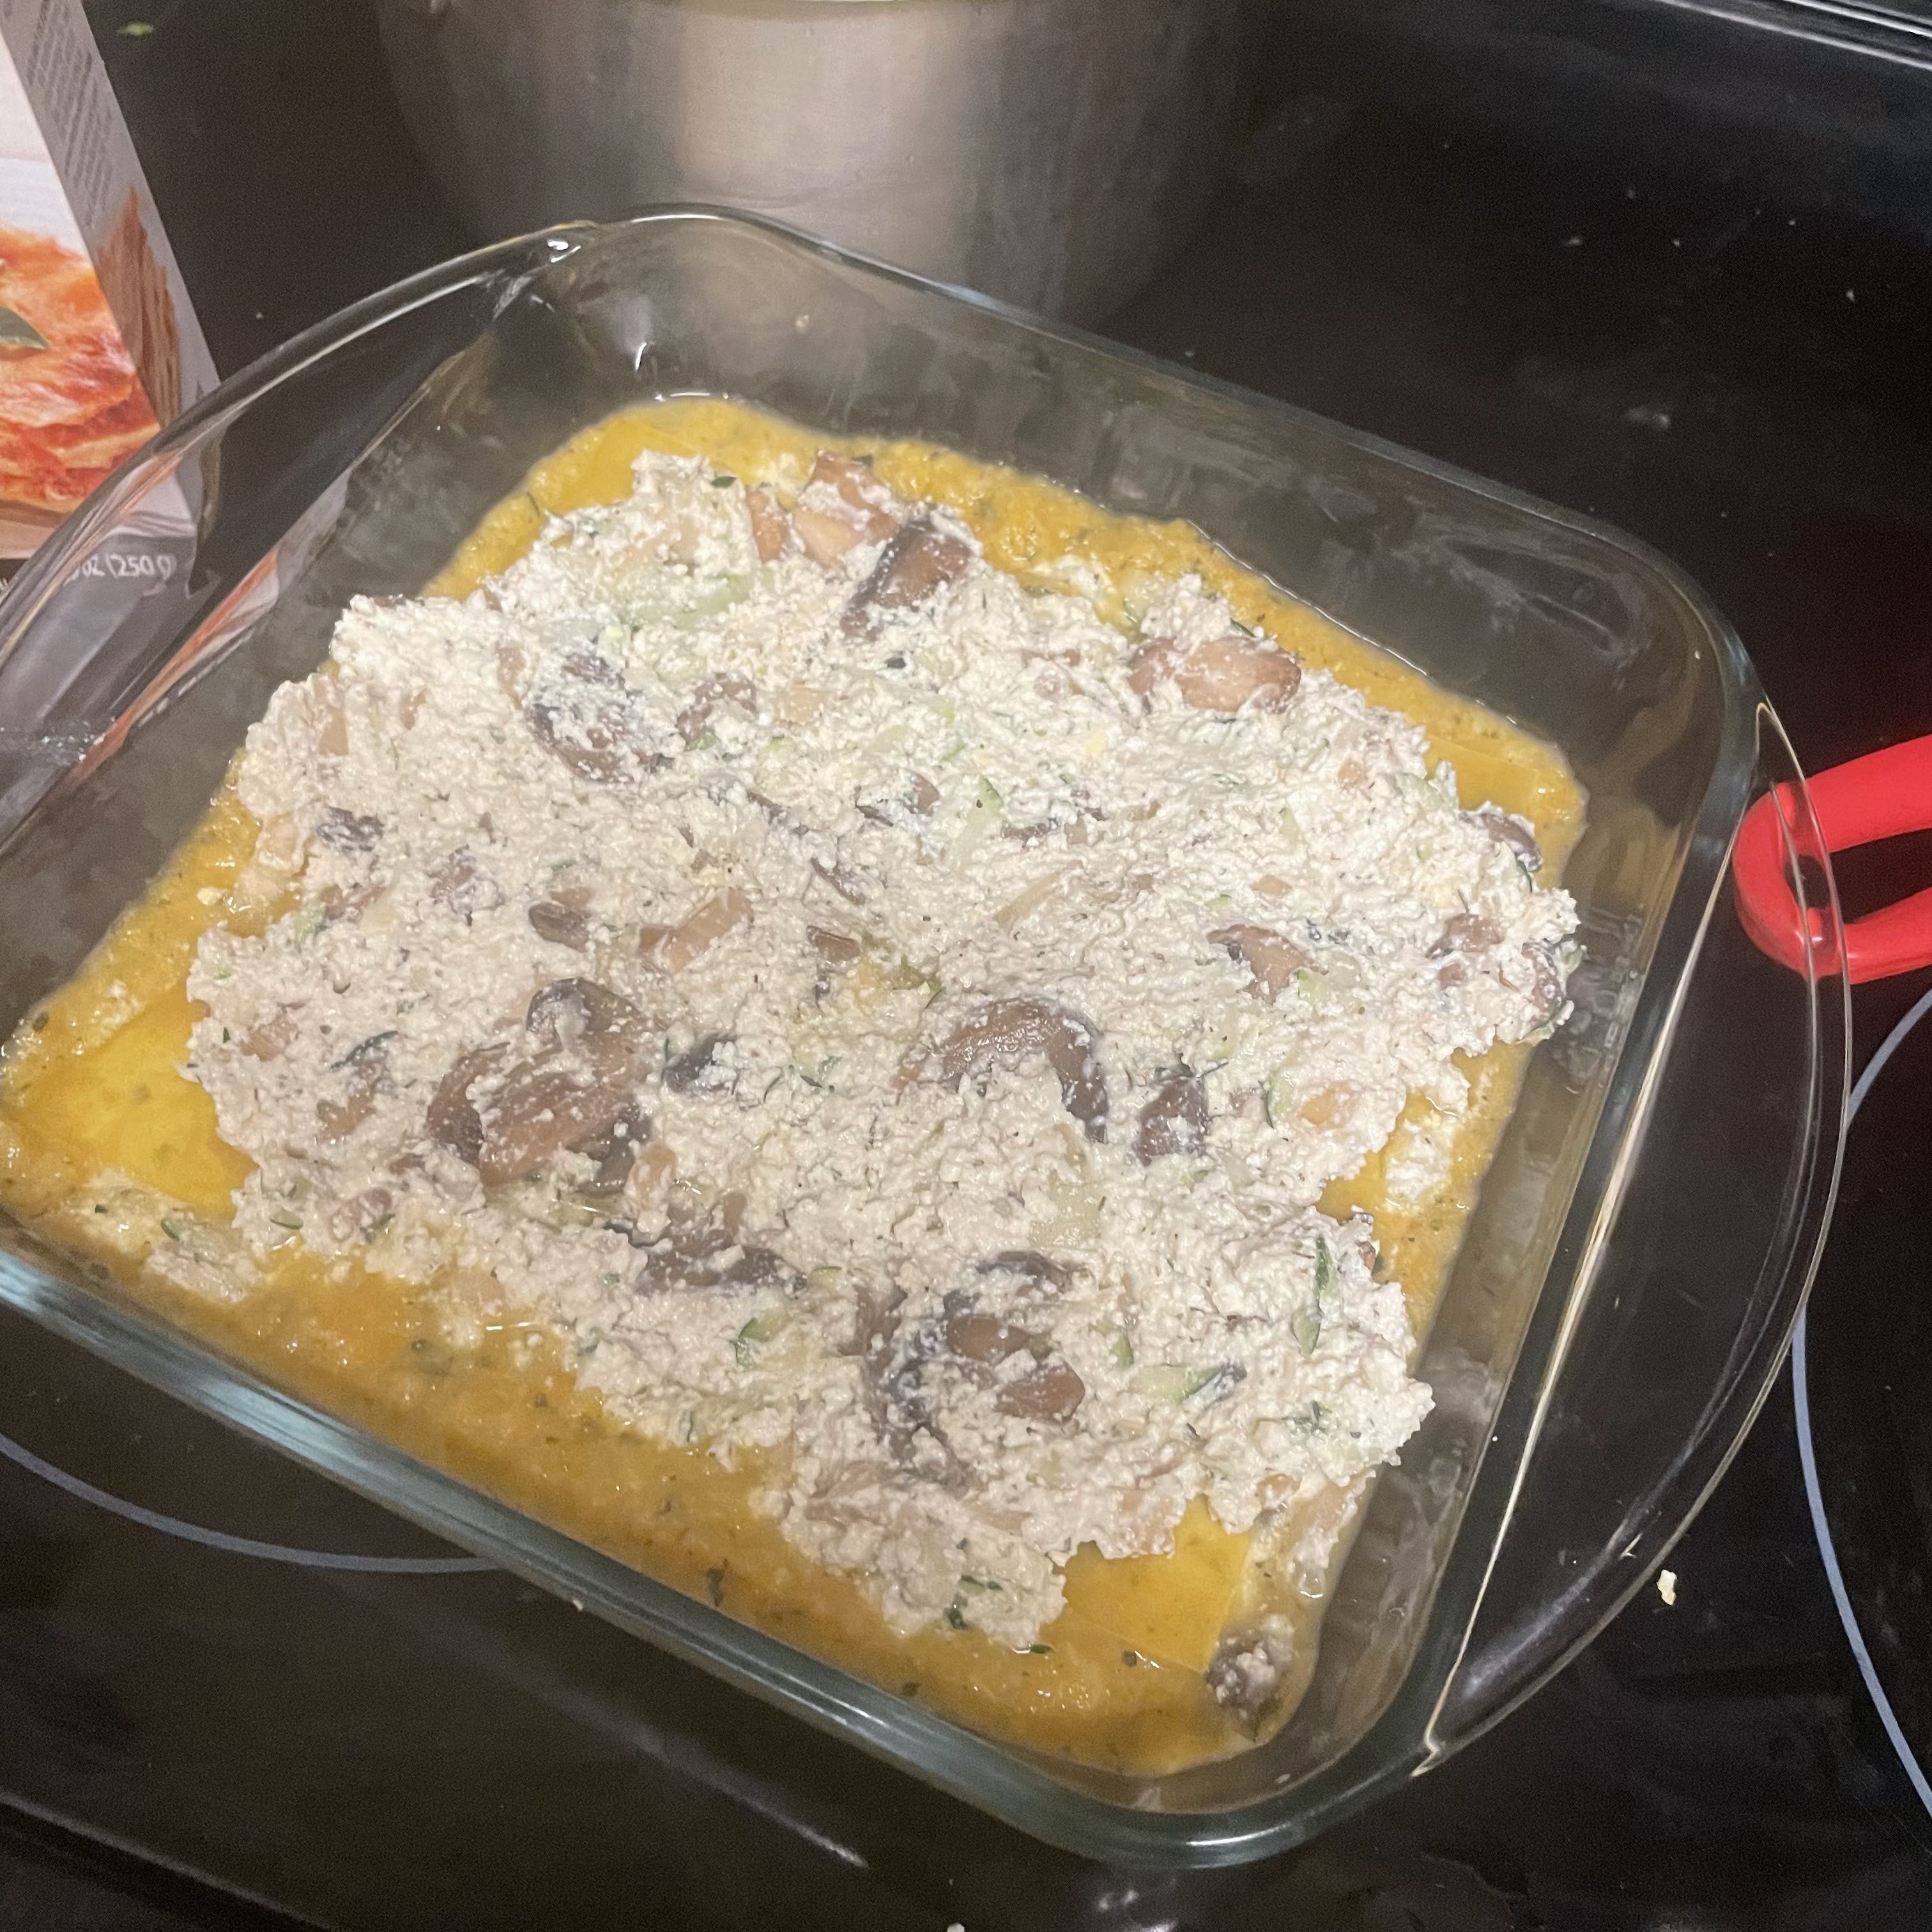
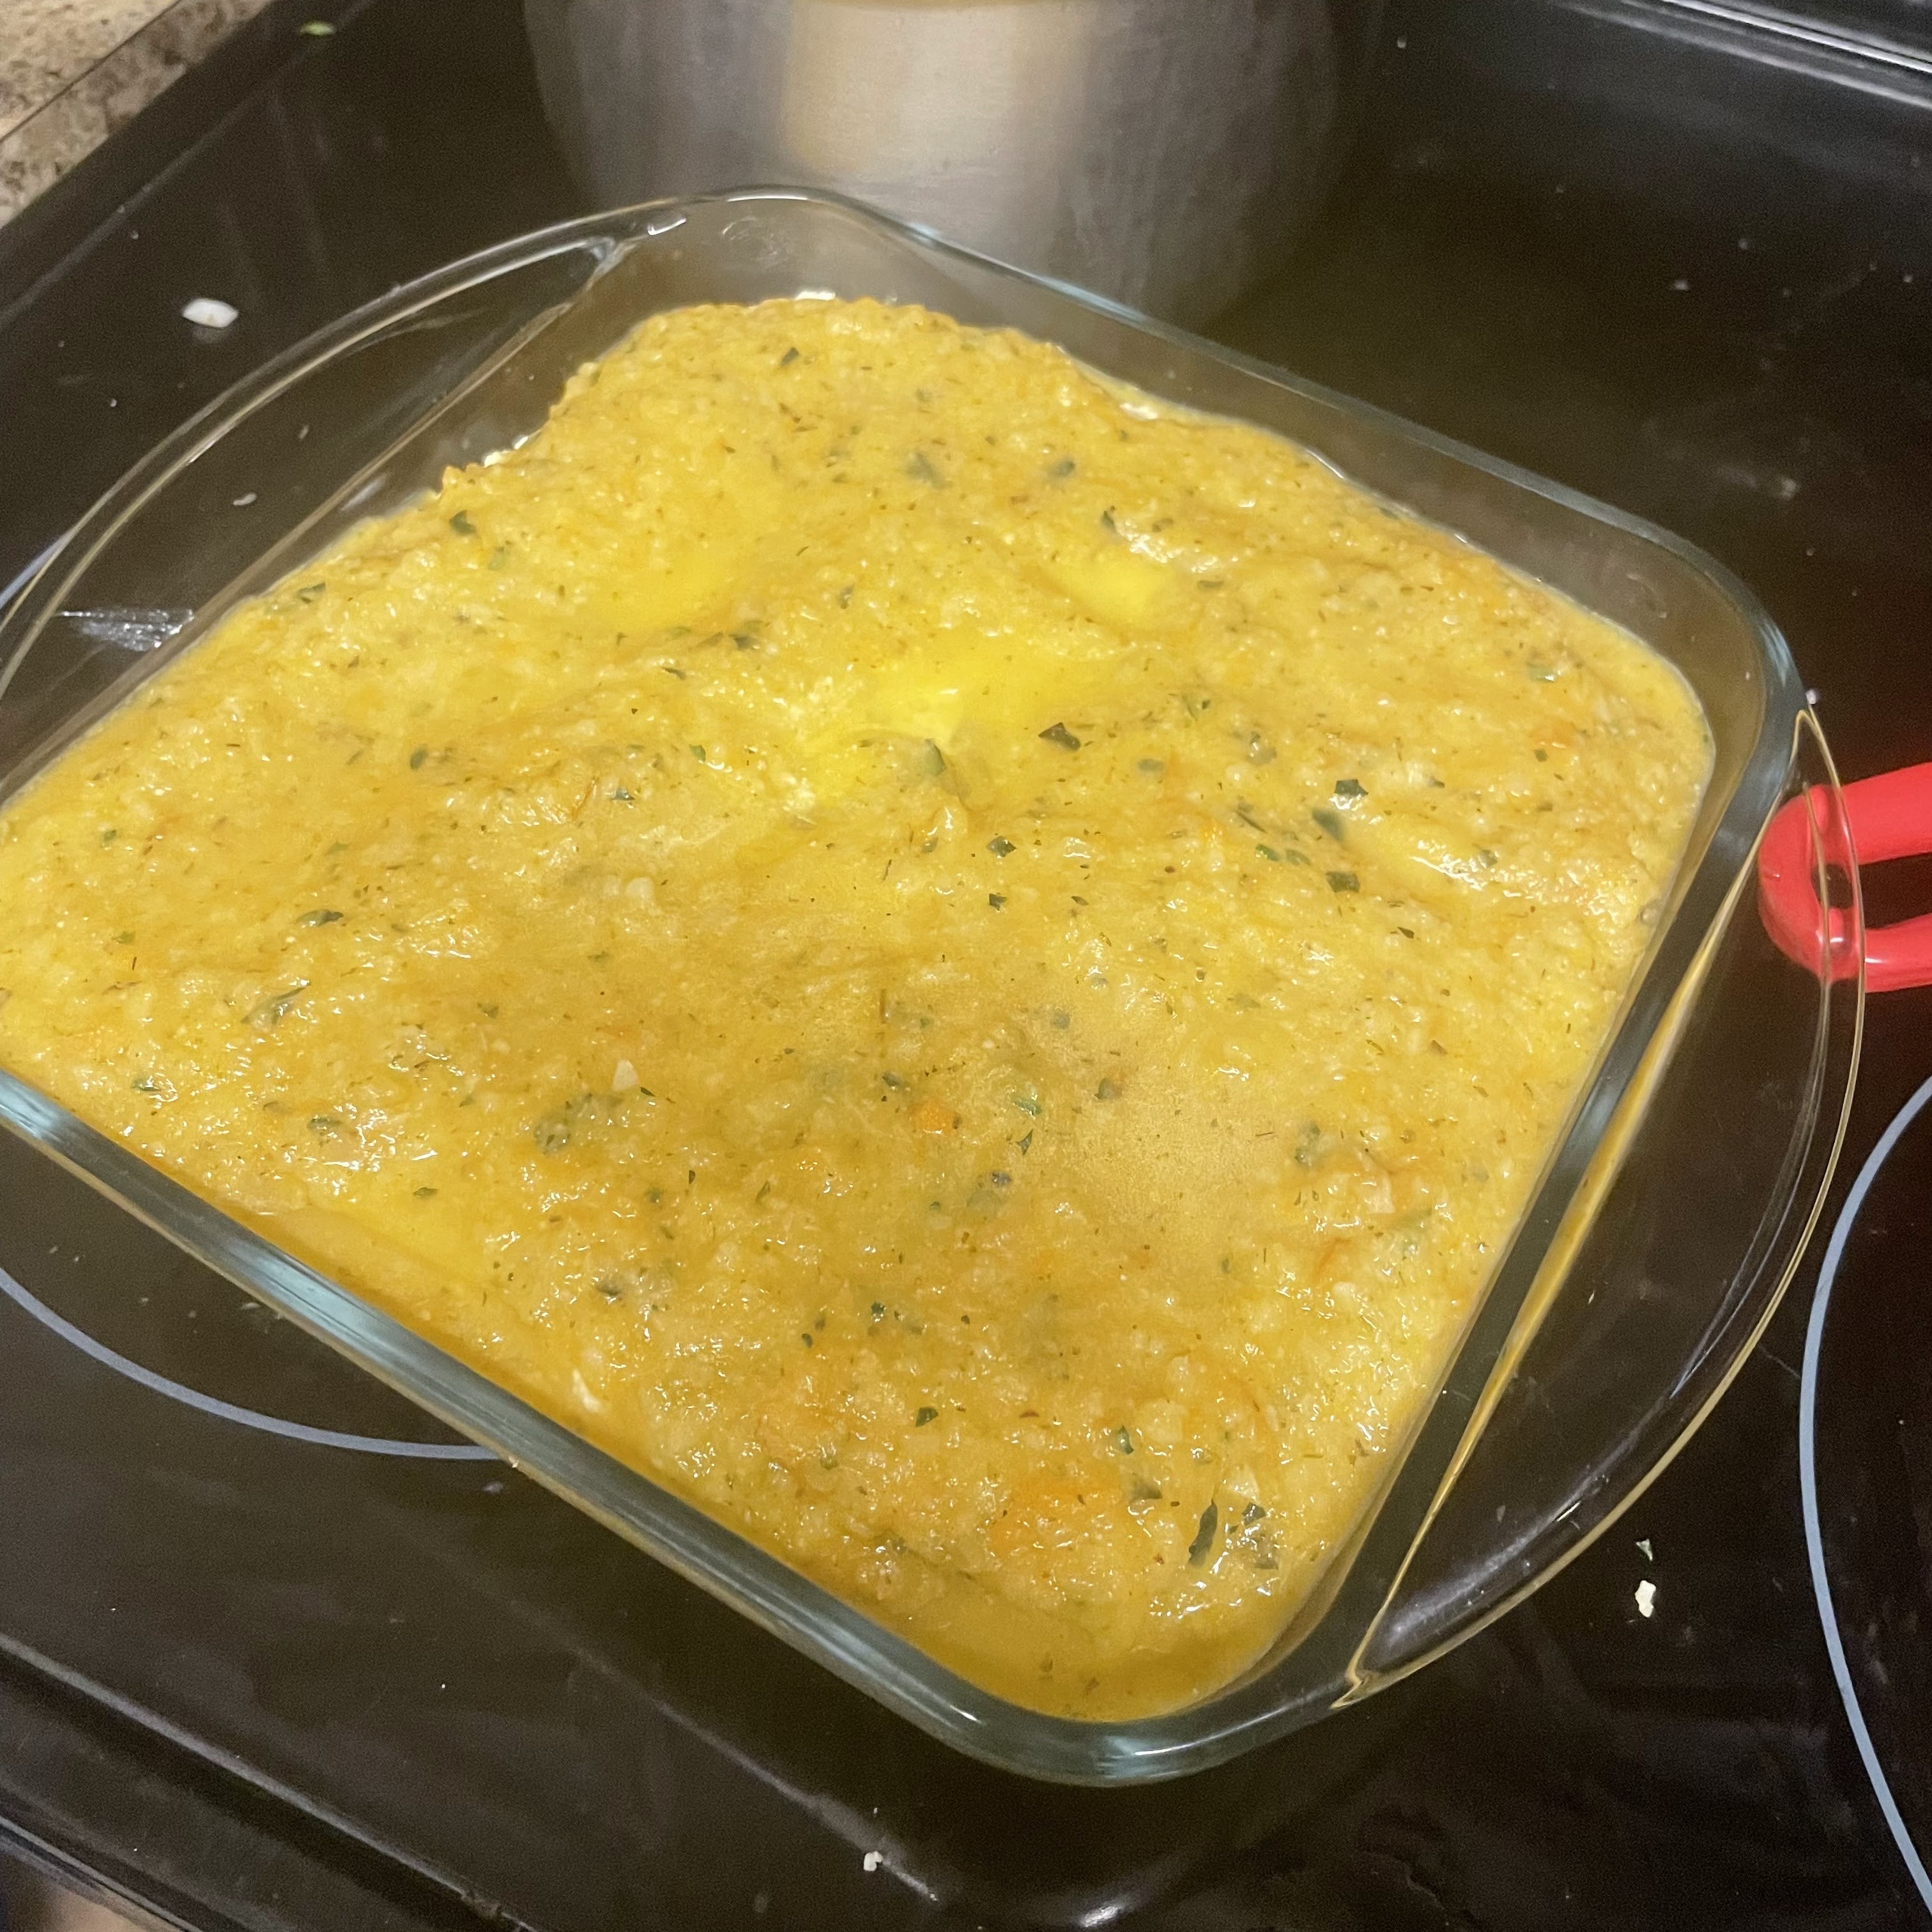
Step 1: wash and chop your potatoes, onion, and zucchini. Drop them all into a greased baking dish, ideally into a single layer. They’ll be squished together, which is good.

potatoes, onions, and zucchini - large cut and mixed in the bottom of the baking dish

Step 2: in a measuring cup or other vessel with a pour spout, add your wet and spice ingredients and then mix well with a whisk or fork.

sauce ingredients collected and started in the measuring cup with pour spout

Step 3: pour about half of the sauce over the veggies. Use a spoon or tongs to toss the veggies in the sauce to coat all sides.

Step 4: place your chicken on top.

Step 5: pour most of the remaining sauce and use your hand(s) to quickly coat the entire chicken thigh – not just the top. Pour any remaining sauce on top of the chicken.
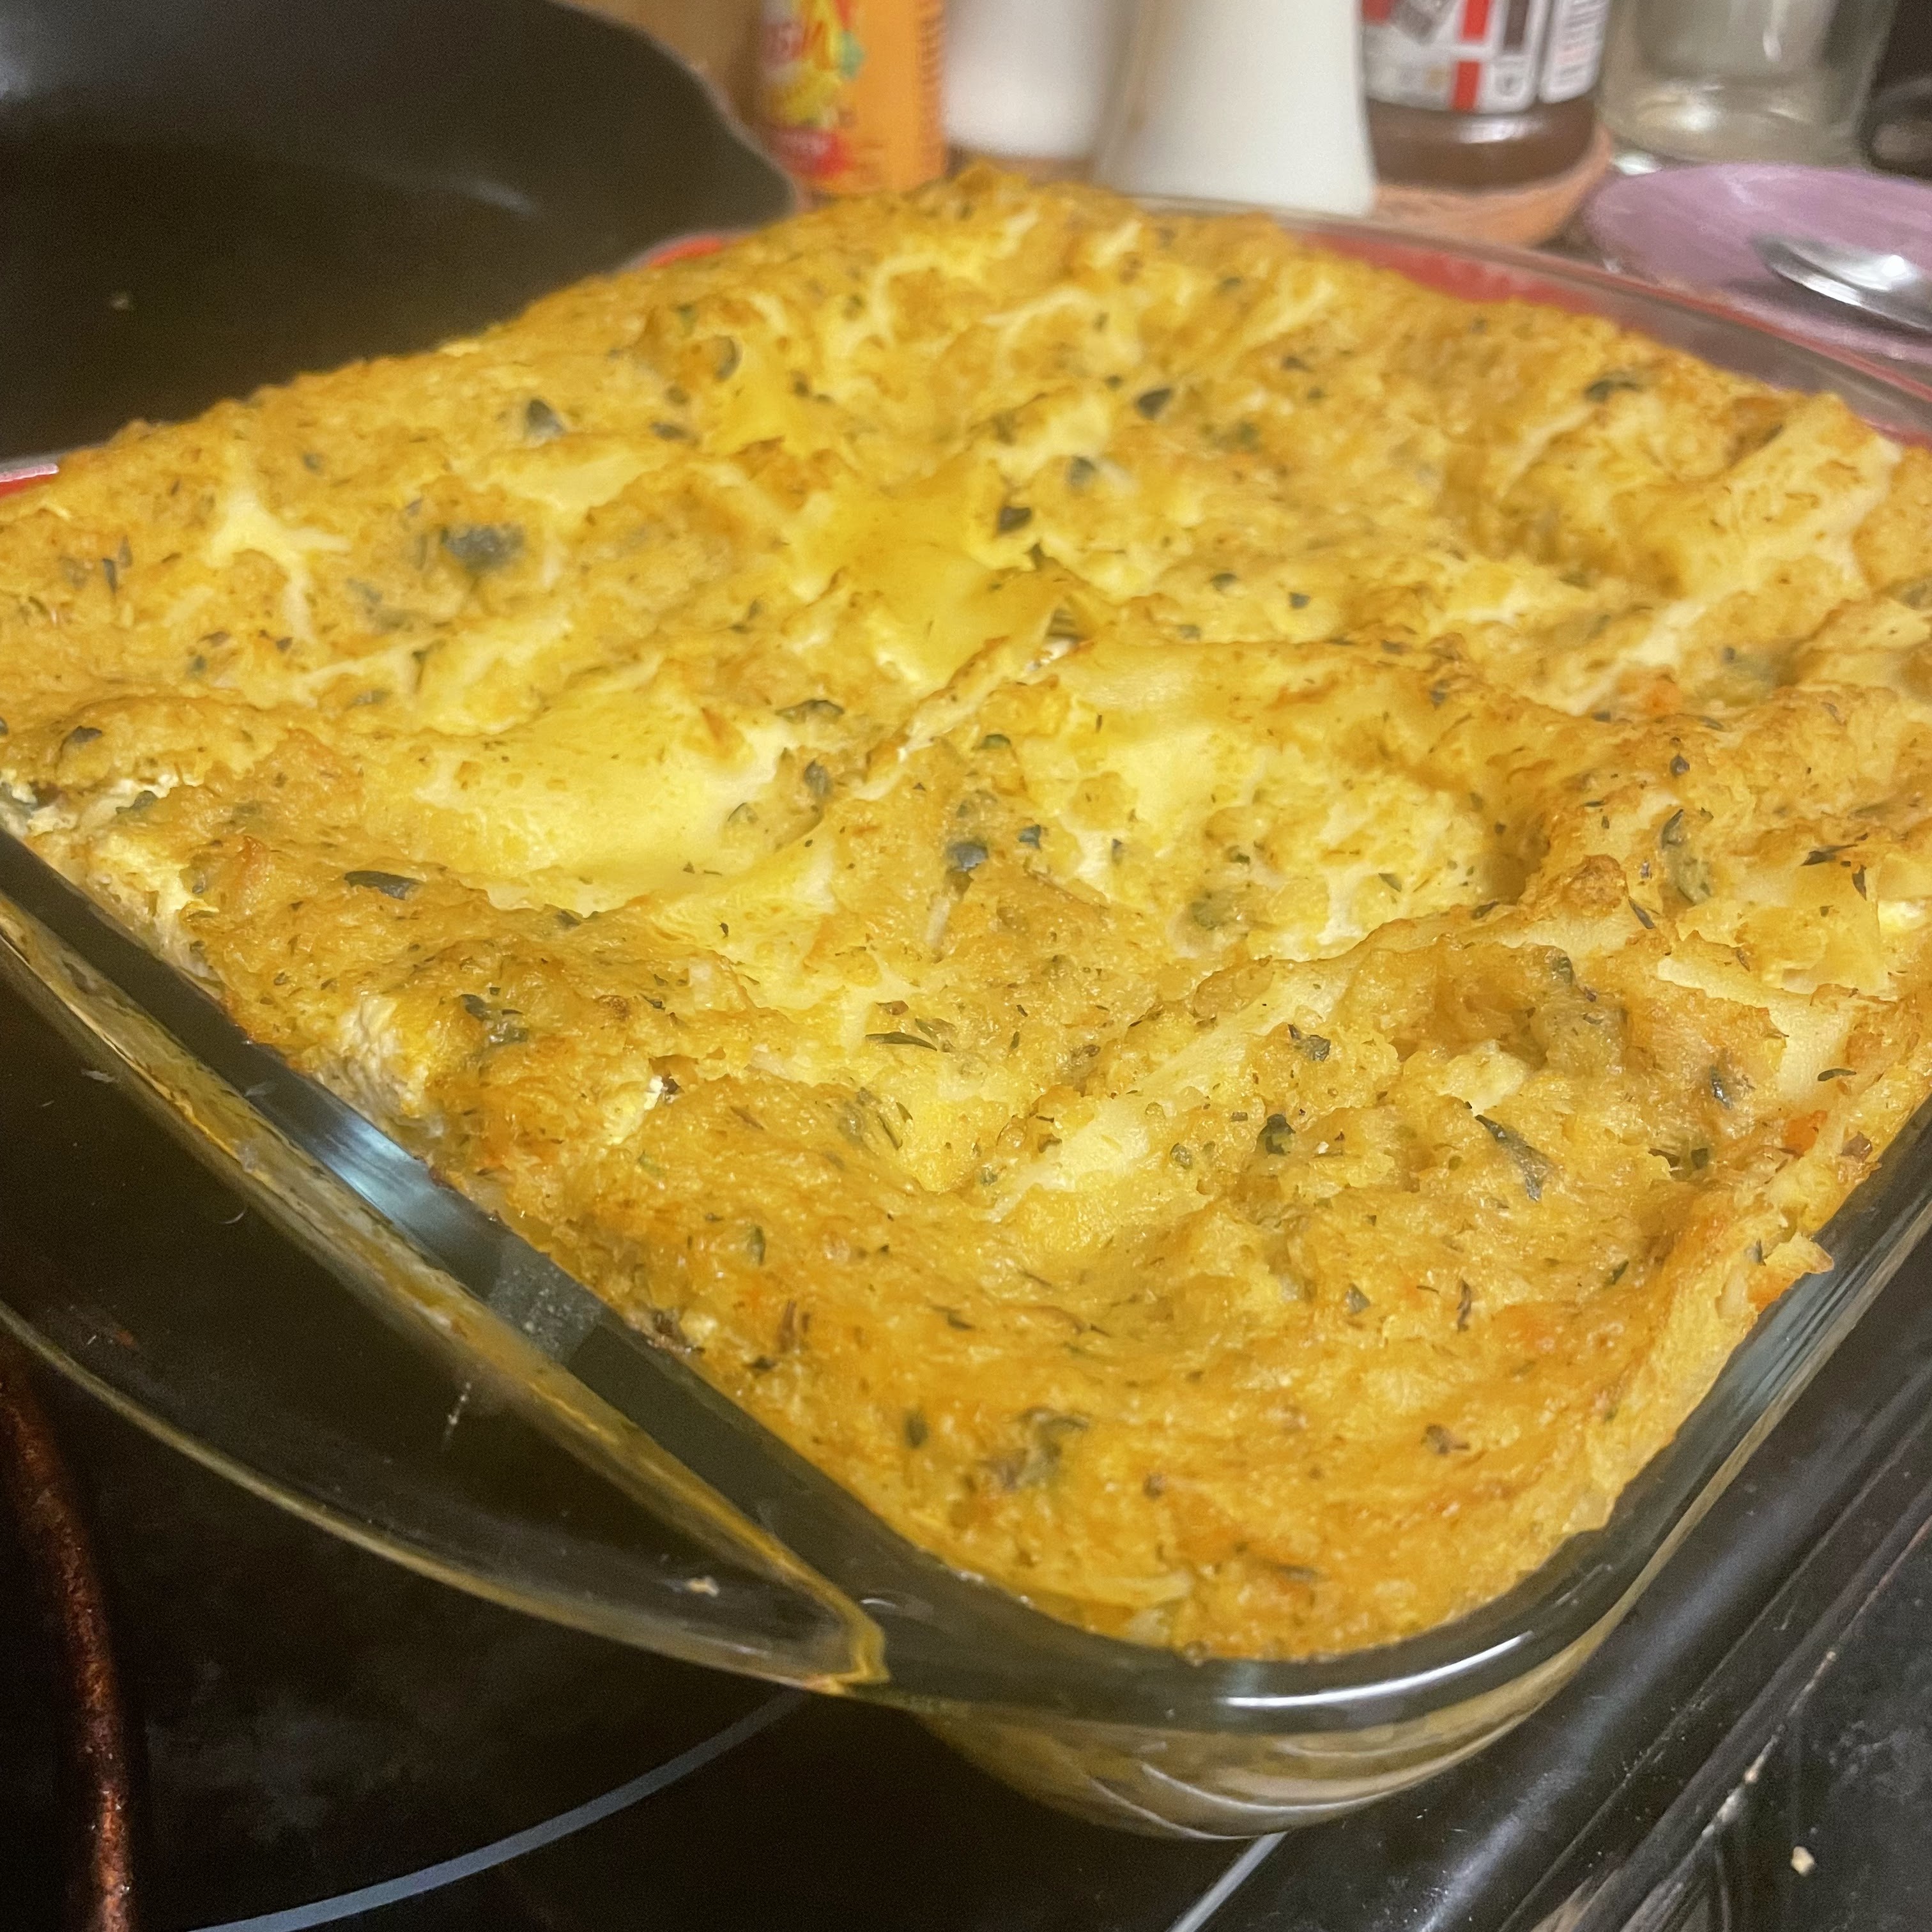
use all of the sauce - half on the veggies first and the remaining amount on the chicken placed on top of the veggies in the backing dish

The Cooking Process

Step 1: preheat the oven to 400 degrees Farenheit. NOTE: I do not wait for the oven to fully preheat to put in the dish; my oven rarely takes more than 7-8 minutes total to preheat, so the difference is negligible for such a long-baking dish.

Step 2: cover the baking dish with foil, wrapping the edges snuggly around the end handles.

foil sealed baking dish placed on the lowest oven rack (closest to the baking heating element)

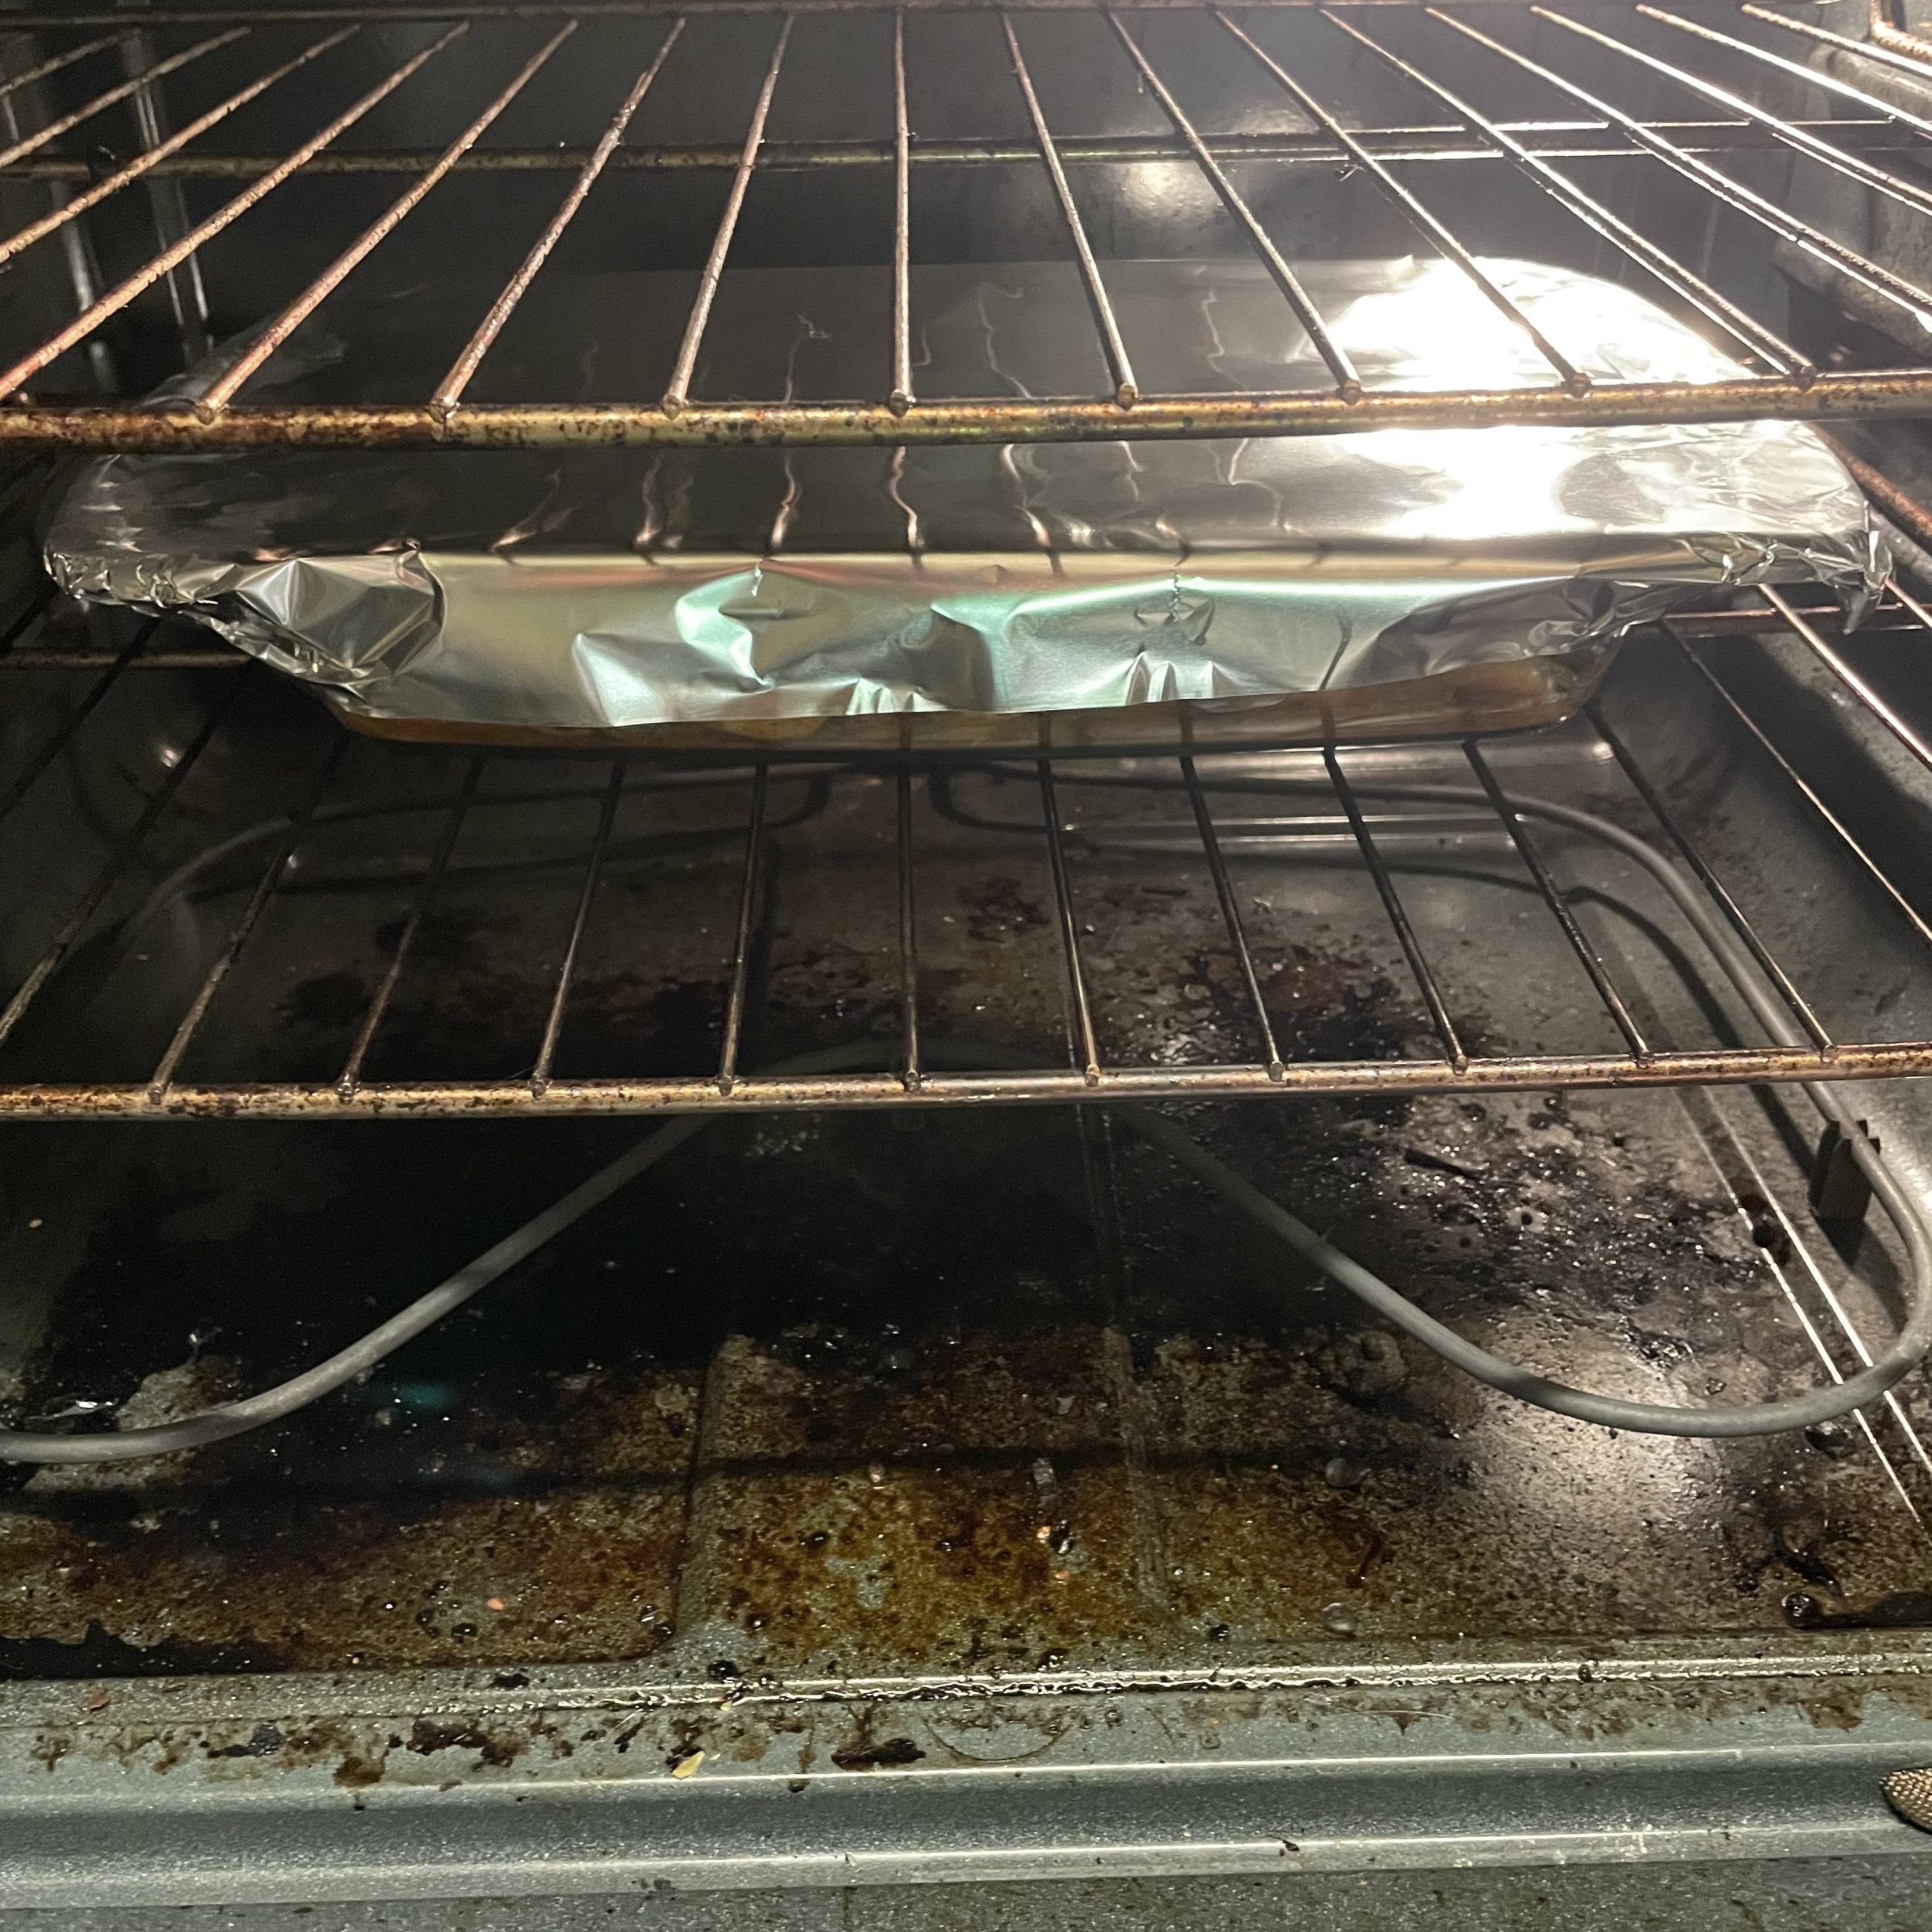
Step 3: bake for 45 minutes with the foil on and on the lowest rack, closest to the baking element (usually at the bottom of the oven).

Step 4: slide out the oven rack and remove the foil lid.

uncovered for the final 15-20 minutes

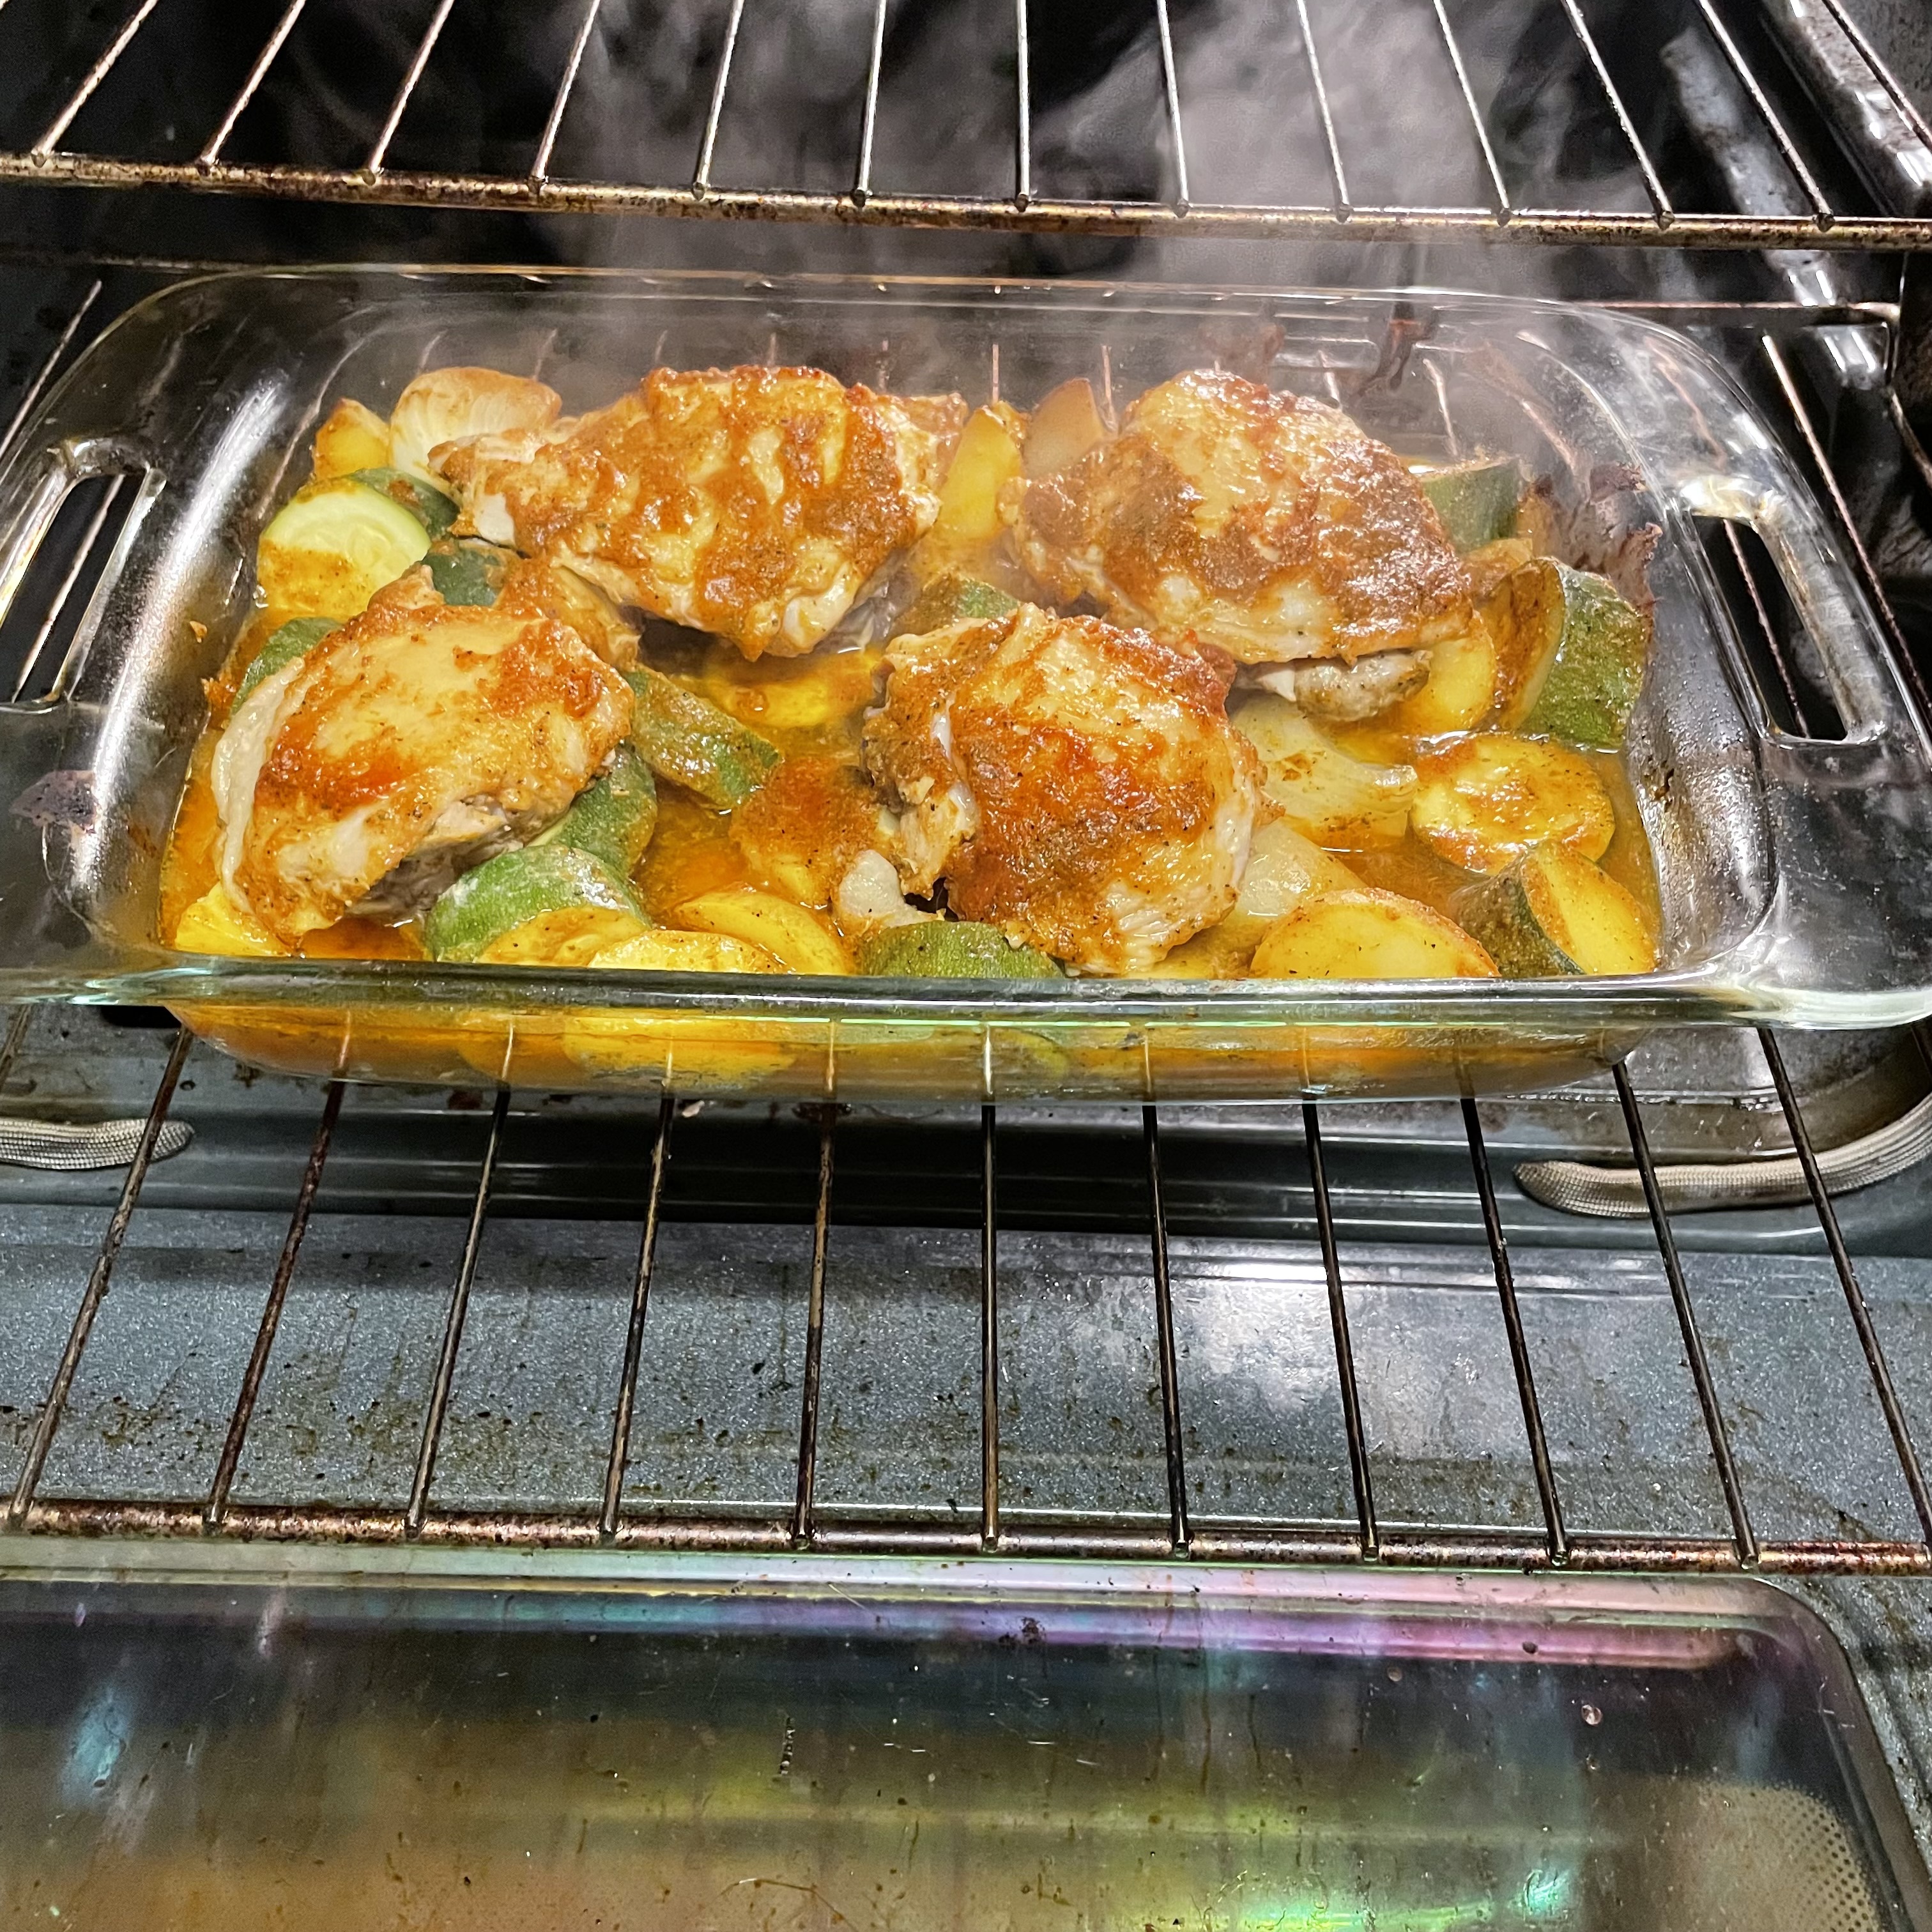
Step 5: push the oven rack back in and set the timer for another 15 minutes. This is an essential step for cooking the skin to be pleasant to eat and ensure the meat is fully cooked.

Step 6: take out of the oven and let rest for 10-15 minutes to cool enough to eat without burning fingers and tongues.

when it’s all done – let cool and serve

Enjoy!

Posted in Being Healthy, coeliac friendly, Cooking, dairy free, diabetes, diabetic friendly, gluten free, low carb, vegan

Lasagna – Gluten Free, Dairy Free, Nightshade Free, Accidentally Vegan

I’ve been craving lasagna, but anything Italian is really hard when your food allergies/intolerances hit all three major Italian points: pasta, cheese, and tomatoes. I mean, c’mon, it’s their flag, for crying out loud.

Gluten-free Lasagna Noodles

Gluten free pasta is easy as long as you have some kind of access to the Italian made stuff – and thank Amazon, I do! These gluten free, egg free, no cook lasagna noodles are perfect. In fact, one box makes two 9×9 lasagnas for the single person (or maybe 2-person family). Highly recommend, but you do you.

Buy on Amazon at https://www.amazon.com/gp/product/B00HRJNNSS/ref=ox_sc_act_title_3?smid=A3MXLTRINUPWUY&psc=1

Tomato-free Sauce

This piece of the puzzle has taken me the longest to figure out because all of the “red” vegetables are nightshades, and that’s specifically what I need to avoid – no tomatoes, no peppers. And it finally hit me – ratatouille sauce: roast down what’s currently in season and then blend into a sauce.

What I made today is

  • 1 zucchini
  • 2 carrots
  • 1 whole pod of garlic
  • 1 package of frozen riced cauliflower
  • 2 cups homemade vegetable stock
  • 2T Badia Italian Seasoning
  • 1t salt
  • 1t pepper (I like a little kick)
  • 2T cooking oil of your choice (I like grapeseed oil)

Roast the zucchini, carrots, and garlic at 350 for 45 minutes. While those are roasting, dump the frozen riced cauliflower in a sauce pan with 1 cup of the veggie stock and heat on low, mainly to thaw the cauliflower; you don’t need to “cook” anything.

When the roasting veggies are done, add them to the sauce pan and blend with an immersion blender. Add more veggie stock as needed to get to your desired thick or thinness.

Set aside until ready to assemble.

Dairy-free Ricotta Filling

In the absence of any options for dairy-free ricotta in any market (brick-and-mortar or online), I turn to tofu, which is my go-to for replacing “creamy” ingredients. Normally for this I use silken tofu as it’s already in a soft, silky, creamy state. But I only had extra firm tofu today to make this recipe, so here’s how I turned it into even better faux ricotta than when I use silken: crumble it up well with your fingers, add about 1 cup of liquid (I used my homemade veggie stock), and blend with an immersion blender (secret weapon of this recipe, IMO). Then I add my “regular” mixins:

  • 1 cup shredded zucchini
  • 1 package of sliced mushrooms – sauteed until golden brown
  • 1/2 medium white onion, finely diced (about 2/3 cup) – sauteed with the mushroom until translucent
  • 3 cloves garlic, finely minced
  • 1T Badia Italian Seasoning blend – you do you
  • 1/2t salt
  • 1/4t pepper

Cook the mushrooms by themselves in the same pan you roasted the ratatouille veggies in – no extra oil is needed. Once the mushrooms have browned and the water they released evaporated, move them all to the outer edge of the pan and drop in the onions. Sautee maybe 2-3 minutes more until the onions are less white and moving towards clear-ish. Scoop it all into a bowl to cool for just a minute before mixing into the tofu ricotta.

Mix well in a bowl and set aside until ready to layer.

One of my favorite things about tofu as opposed to soy is that tofu is high protein with almost no carbs; soy is just the opposite – mostly carb with a modest amount of protein much lower than the carb load.

Let’s Assemble

There’s no wrong way to layer lasagna, but I have a few things I like to do to ensure the no-cook noodles are given the best shot at success:

  • Start with sauce on the bottom of the pan before you put in noodle sheets
  • Top each layer with sauce so the noodles are always being set into sauce

When you do this, you ensure that there is always liquid surrounding the noodles during cooking so that they come out lovely and fully cooked like pasta should be.

Otherwise, the tip is to be patient, and to press the thicker layer instead of “spreading” them.

Final Bake

Once you’ve got all your layers done, bake at 350 for 35 minutes. If you are using any cheese on top of yours – regular or dairy free – I recommend adding at the 30-minute mark and baking for about 10 more minutes (longer if you like your cheese browned and crunchy).

Posted in Being Healthy, coeliac friendly, Cooking, dairy free, diabetes, diabetic friendly, gluten free, low carb, nut free, soy free

Chicken, Zucchini, and Corn Burgers

I’ve been craving zucchini fritters and corn fritters and have been on a ground chicken kick, so when I came across this recipe for Chicken, Zucchini, and Corn Burgers from The Cafe Sucre Farine, the ingredients when on the shopping list!

And if you’ve followed me for any length of time, you know I had to make a couple of modifications due to food allergies – though thankfully not huge changes:

  • red peppers (nightshades) are replaced by chopped frozen spinach
  • panko (gluten) is replaced by chickpea flour

Check out how this recipe when for me.

Mise en Place

I’ve been taking an online cooking course in gluten-free and dairy-free cooking, and the first lesson isn’t in cooking itself but in the philosophy of mise en place – preparing all of your raw ingredients so that once you begin with assembly, you won’t have to stop or worry about missing something as you move efficiently through the cooking process. So that’s how I started here since it’s all raw ingredients, mixing and shaping, and then cooking.

  • 1 lb ground chicken
  • 1 cob of corn, kernels sliced off
  • 1 cup shredded and drained zucchini
  • 1/2 cup frozen chopped spinach
  • 4 green onions, sliced
  • 3 cloves garlic, minced
  • 1 egg, beaten
  • 4-6T chickpea flour
  • 2T cilantro
  • 1T cuminn
  • 1T salt
  • 1/2T pepper

Mix with Your Hands

Both sides of my family – the country cooks and the city cooks – have a hands-on approach to cooking. Pretty much any time ground meat is mixed, we use our hands. And this is no exception, especially since I choose to form the burgers and place them on a cookie sheet to bake rather than cook in a skillet.

With replacing the panko with chickpea flour instead of gluten free break crumbs or panko, the mixture remains a bit more wet since there’s not as much carbohydrate to soak up the moisture from the egg, vegetables, and chicken.

I chose to go with the chickpea flour because I wanted more nutritional value than any bread crumb or panko – regular or gluten free – provides while achieving similar results. I also like keeping the moisture available during the cooking process so that the resulting burgers are still juicy.

Meal Prep

And that’s how meal prep is done for this week. These protein- and vitamin-packed burgers will accompany my gluten-free, dairy-free, nightshade-free lasagna for lunch at work.

Posted in Being Healthy, Everyday Musings, God Loves Me!

Re-Discovering Self-Care

I started a new job six weeks ago. An amazing job. A dream job. An exciting job.

And in classic CeCe fashion, I’ve given it everything and more: 10 hour days, nights in front of the tv, weekends. I truly do love it and am enjoying the many ways I get to help others through this job.

Yet no matter how much I love it, it still wears me out…every day.

So last week when my co-leader caught me rubbing my eyes just after lunch, he started a campaign to send me home early, take some time off. Even if I hadn’t been working long days, I’d certainly accomplished well more than expected in a short time and had earned some extra self-care time.

So I left at noon on Friday only to realize I had absolutely no plan for self care. And it didn’t take me long to remember that when that question came up in my interviews, my co-leader had noticed…and noted…that I didn’t have a good answer for what I do for fun (self care).

So I gave myself permission to treat myself to some things I used to do regularly, a long time ago, that had somehow fallen off of my schedule:

  • massage – for the gift of touch, of meditation, of being present and focusing on the real needs of my physical body, of my acceptance that I can’t will away the tired when my body really needs rest
  • my favorite coffee – for the uniqueness, the spice, the warmth, the moment of earthiness with the first sip
  • my favorite handmade soap/shampoo/lotion store – for the indulgence, the expense, the luxury, and the promise of a bath rarely prepared
  • my favorite clothing store – for the self-expression through clothes that I’ve discovered only with age and acceptance of my body and my inner weird
  • my favorite rock – for the gift of stability, a place to sit, the elevation above the ground so I can see farther and more clearly whatever I’m looking at
  • my favorite church – for the blessing of my God, the comfort of a familiar place to worship, the words of prayer and absolution, the message I need to hear whether I like it or not, the safe place to cry it out in frustration, pleading, or thanksgiving
  • cooking – for myself to make intentional choices about how I feed my body and mind, for others to care for them
  • blogging – for sharing how my brain works things out, not always problems – more things that intrigue me, challenge me, seem important even when I don’t yet know why

Things I didn’t do that might also become part of my self care:

  • read a book or listen to a podcast – a devotion, a memoir, I think of this as something soul-feeding rather than mind-feeding, though certainly I’m happy for it to do both
  • hike a trail or waterfall – the mountains call to me, so that’s where I instinctively head for quiet time; and I wasn’t in the mountains this weekend
  • paddle a dragon boat on the lake (coming in spring)
  • meditate – something I’m trying out with a group starting 1/14

I have so many questions about what and how, all because I got out of the habit:

  • What do you do for self care that I might add to my try it out list?
  • What are you looking to achieve with self care?
  • What hasn’t worked for you, and why do you think it didn’t work?

I’d love to read what your self-care experiences have been.


Posted in Being Healthy, Cooking, corn free, gluten free, nut free, soy free

Prep-ahead Clean Lunch for $3.72: Ginger Chicken, Brussels Sprouts, Asparagus, Roasted Potatoes

You know those prep-ahead clean eating lunch videos – often from Tasty? Well, I decided to give one a whirl.

Here’s the basic concept: pick 1 protein for 3-oz servings, 2 vegetables, and 1 gluten free carbohydrate (rice, potatoes, quinoa).

IMG_2144Mine: chicken breast with ginger aioli, brussels sprouts, asparagus and mushrooms, and creamer potatoes.

I took some help from my local Harris Teeter produce: cut and salt/pepper/garlicked brussels sprouts and asparagus pack ($3.99 each) and a ready-to-bake-in-pan package of creamer potatoes (also $3.99). The potatoes came with a seasoning packet, which I chose to use because the sodium was really, really low.

The only thing I made was garlic aioli. How? Peel some garlic – about 2 inches worth – and pour 1/4 cup of your good oil (olive, grapeseed, coconut) and a pinch of salt into your bullet blender and let it go. Then I brushed it directly onto my chicken breasts. I drizzled the little bit left over onto the brussels sprouts, just because.

Into a 450°F fully preheated oven for 30 minutes. That’s all it takes.

IMG_2148Let it cool and divvy it up into four microwave safe food storage containers. Voila. Lunch for the week – for me, at least, since I have only four days with a fixed lunch hour.

Cost Analysis

  • $2.90 – Chicken Breast – one giant one from a 6-pack, cut into 4 pieces
  • $3.99 – pre-cut asparagus with sliced mushrooms and minced garlic
  • $3.99 – pre-cut brussels sprouts seasoned with salt and pepper
  • $3.99 – creamer potatoes already in a baking pan and including seasonings

Total = $14.87

Cost per lunch = $3.72

Posted in Being Healthy, corn free, gluten free, nut free, soy free

Day-of Homemade Baked Beans

IMG_2085
That splatter around the rim is a result of the sauce reduction process. Yum!

Earlier this year, I made from dry-bean-scratch baked beans for a group of out-of-towners, and well, I think it blew their minds. And I get it. Even my family’s “Aunt Von’s Baked Beans” come from the 1940s, a time when country cooks like Aunt Von would have made most bean meals from dry beans, but even her recipe starts with Campbell’s Baked Beans – already seasoned and sauced.

But c’mon, what’s it gonna cost you to experiment and really understand and control exactly how your baked beans taste instead of trusting what comes out of a can with ingredients made or refined in a lab? These are my day-of baked beans – the only difference is that I start with plain, unseasoned, unsalted canned beans because they are pre-soaked for me. Everything else is the same as my regular dry-bean recipe:

  • 2 cans of great northern beans, drained and rinsed
  • 1 green bell pepper, diced tiny
  • 1 small or 1/2 large sweet onion, diced tiny (try to get Vidalia or Wadmalaw)
  • 1 large or 2 small garlic cloves, minced
  • 1 can of tomato sauce (try to get no salt added)
  • 1/4 – 1/2 cup brown sugar – for my family, I use 1/2 c, for out-of-towners I use 1/4 c
  • 1/3 cup worchestershire sauce – I use a gluten free, corn free, soy free version
  • 1T apple cider vinegar (more if you like it more tart than sweet)
  • 1t salt
  • 1t pepper
  • 1t ginger (ground for sweet, fresh diced for spice)
  • 1/2t all-spice
  • 1 pinch red pepper flakes (literally 10-15 flakes)
  • 3-4 slices of bacon, cut into 1-inch pieces

IMG_2083Mix everything together in a bowl at least 2 hours before you need to start baking (at least 4 hours before serving). Taste to see how sweet, tangy, tart, spicy it is and add seasonings as desired. Keep in mind that at this stage, the tomato sauce is the main source of tangy and that will mellow into sweet during baking; be careful not to go overboard on sweet at this stage.

Ingredients that contribute to sweetness are tomato sauce, sugar, bell pepper, onion, garlic, and ground ginger.

Ingredients that contribute to tangy- or tartness are tomato sauce, apple cider vinegar, worchestershire sauce.

Ingredients that contribute to spiciness are garlic, fresh ginger and red pepper flakes.

Cover with plastic wrap or lid and let marinate on the counter for at least 2 hours. It’s important to NOT put it in the refrigerator because that will slow down the marinating – not ideal for day-of beans.

IMG_2084Pour into 8×8 or 9×9 casserole dish and top with bacon pieces. Put in 350F oven for 90-120 minutes. Test at 90 minutes by lightly jiggling the dish. If it moves like liquid, makes a ripple, it’s not done yet. You’re looking for the liquid to reduce to a thick glaze and fully cooked bacon on top, not a thickened sauce and still-white fat on the bacon. And the bacon won’t really start to cook until the liquid stops touching it.

Another way to think of the ideal consistency of baked beans is that when you spoon then onto the plate 1) you don’t need to use a slotted spoon to drain them and 2) you don’t have to worry about the juice contaminating anything else on the plate.

Naturally, these are my ideals as a Southern cook in South Carolina who learned to cook from a Texas and Oklahoma ranch or cowboy style of cooking. Think about it: you can’t ride a horse around with a pot of juicy beans sloshing around.


Posted in Being Healthy, corn free, gluten free, soy free

Gluten-free Italian Dinner: Pesto Chicken and Tomatoes and Rice

IMG_2078
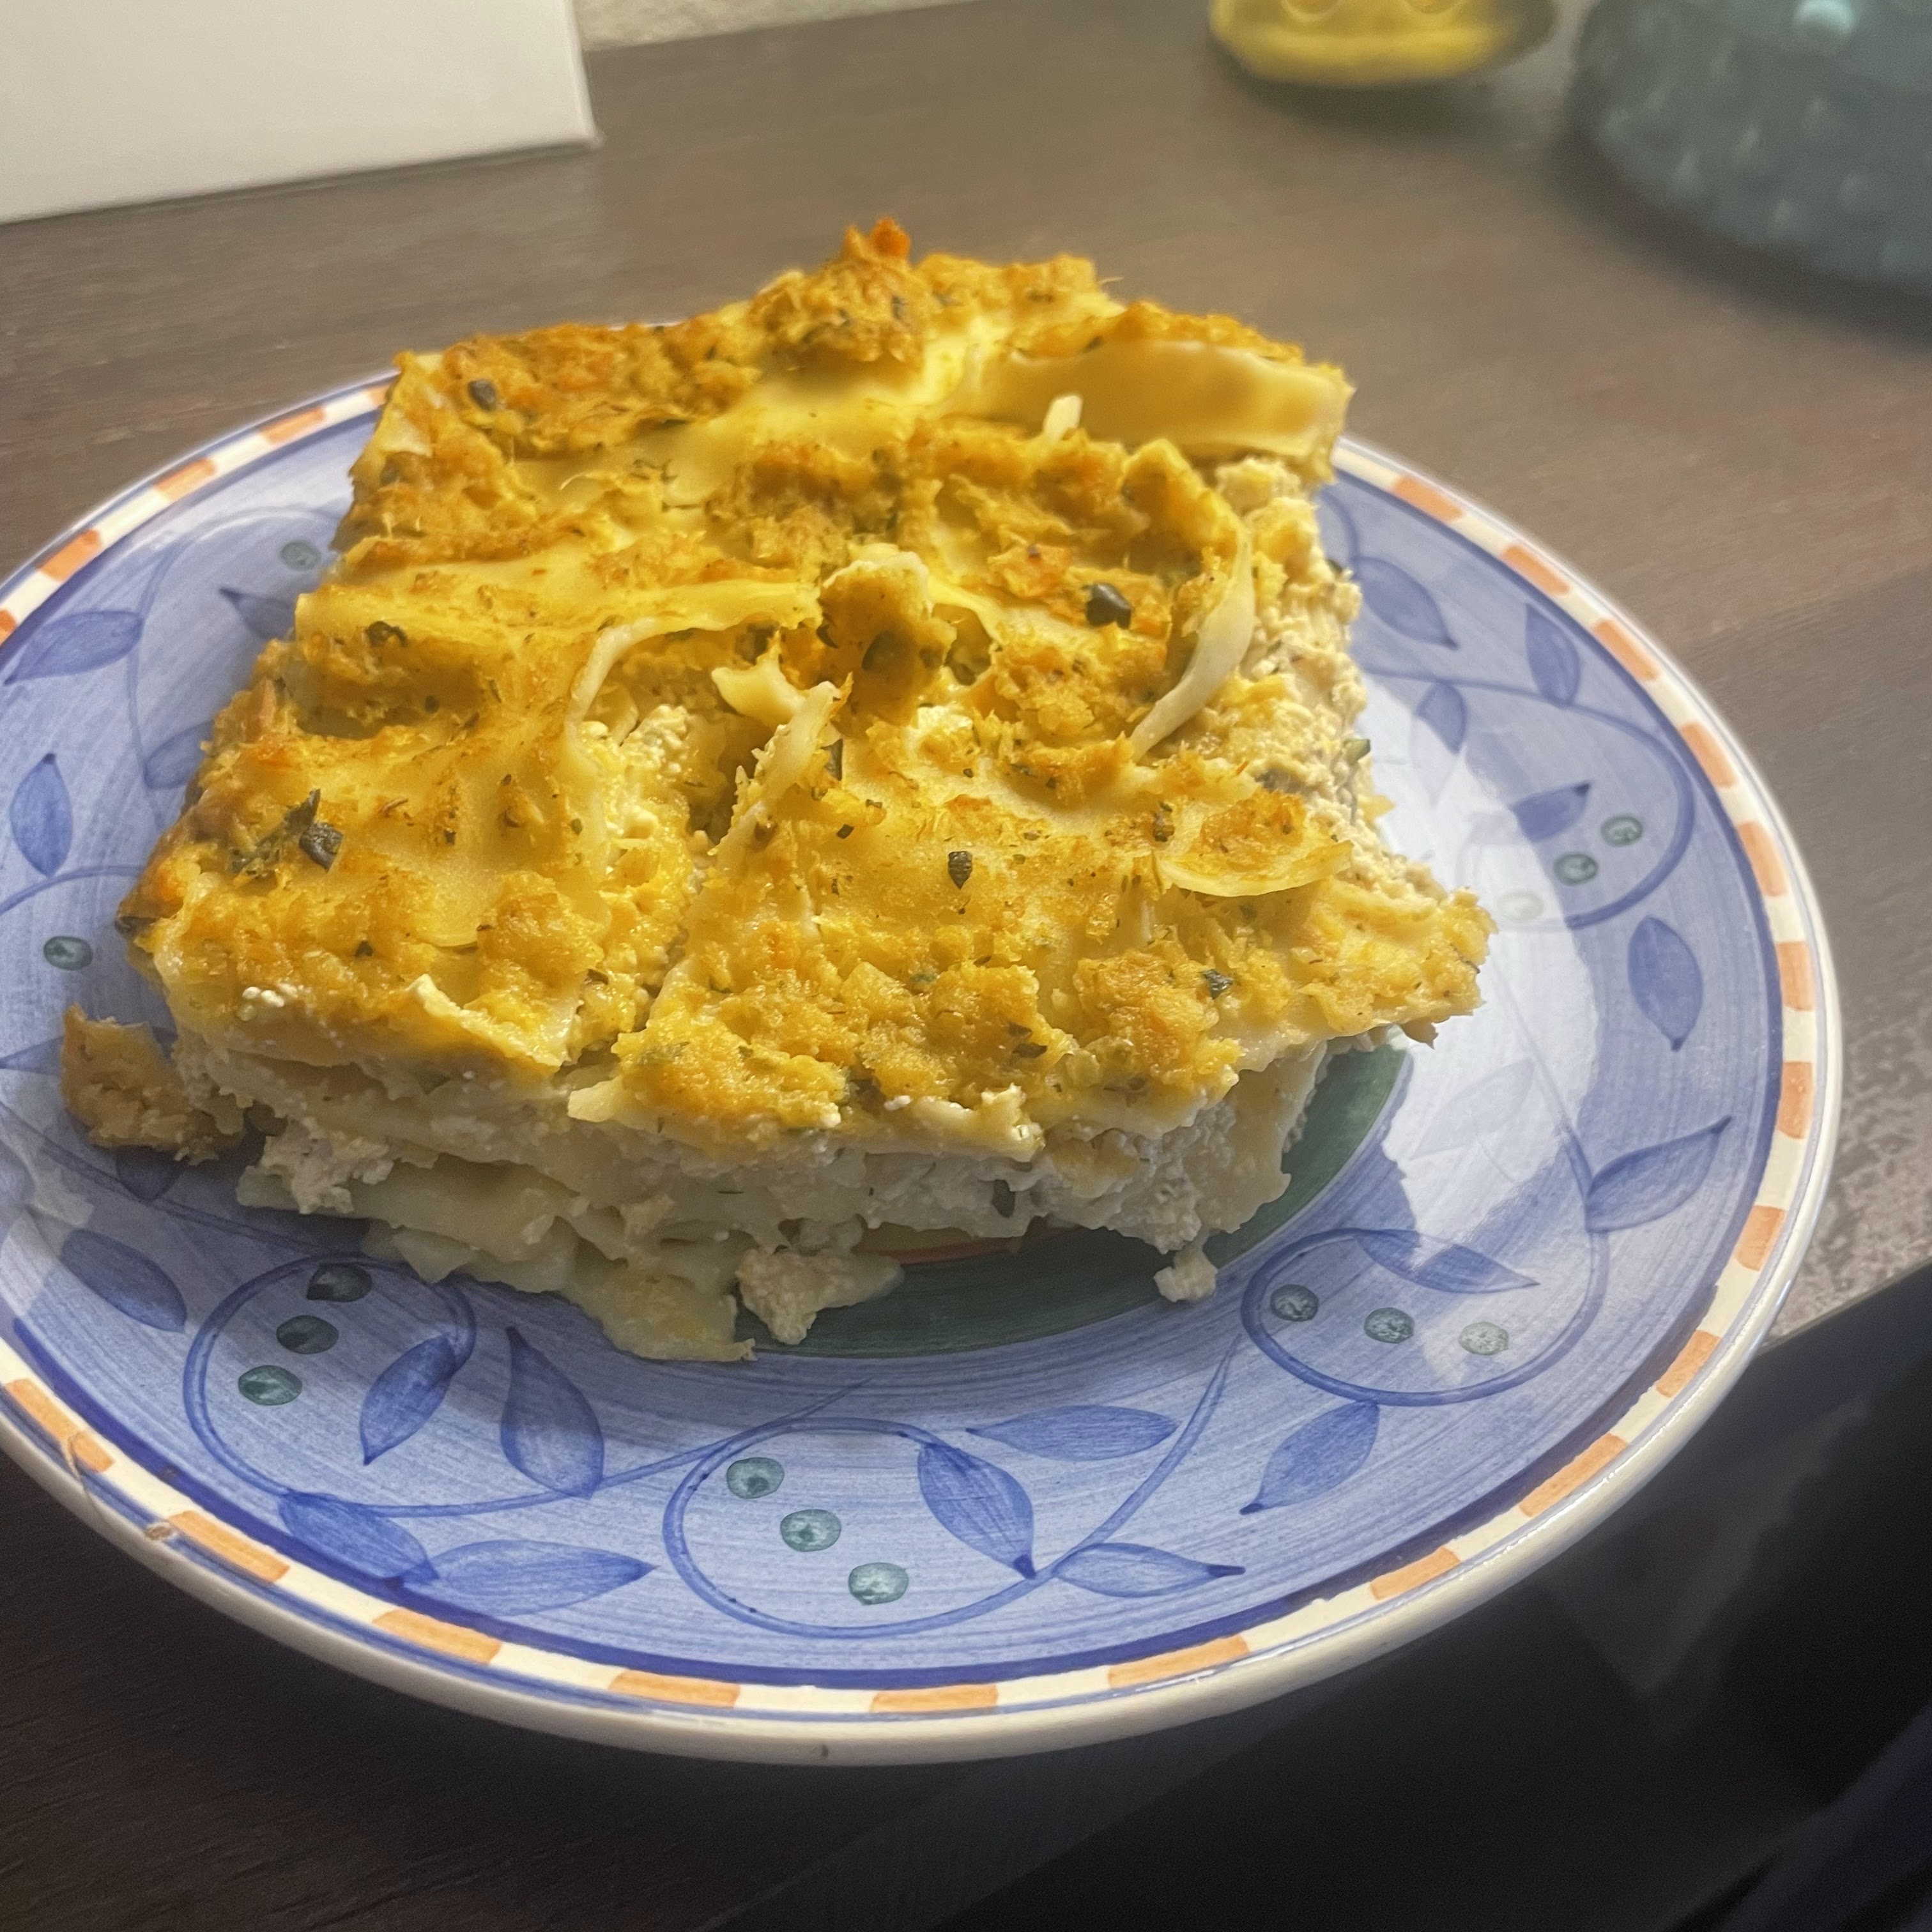
Gluten-free means you can never have authentic Italian food again, right? WRONG! There’s so much more to Italian food than pasta. Here’s one of my favorite 1-pan Italian dinner bakes that hits the rights notes with the whole family.

Ingredients (in order of use):

  • 1.5 cups white rice (long grain, jasmine, basmati, whatever)
  • 1 14 oz can of diced tomatoes with Italian seasonings already included
  • 2 cups water, chicken stock, or combination (especially if you have some you just need to use up in the fridge)
  • 2 lb. chicken breast and/or thighs, skinless, boneless (roughly 4 pieces, 1 per person)
  • 1 8 oz container of pesto

NOTE: this is the semi-homemade version, as Sandra Lee might say; you can certainly make your own chicken stock, dice your own tomatoes, and blend your own herbs into pesto if you’re so inclined.

Pre-heat your oven to 350°F.

In an 8×8 or 9×9 baking dish, combine the rice, diced tomatoes, and chicken stock (or water). Put in the oven for 30 minutes.

After 30 minutes, remove and stir mixture; most of the rice will still be small and hard – don’t worry – that’s normal!

Add your four pieces of chicken. Spoon roughly equal amounts of pesto over each one – approximately 3 Tbspns – and spread to cover the chicken.

Return to oven for 30-45 minutes, depending on how large/thick your chicken pieces are.

This dish is really great for Southern American families where red rice is king; the minor change up in herb seasonings helps keep things fresh without completely blowing picking kids for a loop.

TIP: make ahead and reheat or freeze. When you thaw it out, add about 1 cup of stock or water to make sure the rice doesn’t dry out when heated in a 350°F oven for about 30- minutes (assuming thawed to room temperature.

Posted in Being Healthy, Cooking, corn free, gluten free, nut free, soy free

Greek Chicken and Rice

IMG_2004
Greek Chicken and Rice with Feta Cheese, accompanied with marinated cucumbers and onions (refrigerator pickle)

I’m not trying to present anything authentically Greek like your native or first-generation Yaya made, but rather to elevate the simple chicken and rice dish with the flavors most Americans associate with Greek or (generically) Mediterranean food. In fact, if you leave off the Greek-ish additions, you could just say this is Lemon Pepper Chicken and Rice and stop there :-).

To easily change up a wonderful dish when it’s getting a little stale in the dinner rotation, consider adding lemon juice to your chicken and rice bake and serve with a sprinkle of feta cheese and olives.

Ingredients for a 4-serving bake

  • 1 cup uncooked white or brown rice (jasmine, basmati, American long grain, whatever)
  • 2 cups water or chicken stock or combination
  • 1-2 lemons, juiced (1-2 T prepared lemon juice) – to taste
  • 4 4-6-oz pieces of boneless chicken – any combination of breasts and thighs
  • 1t salt (only if using water because even low sodium chicken stock already has salt)
  • 1t – 1T black pepper – to taste
  • 1 package of crumbled feta cheese
  • 1/2 cup roughly chopped kalamata olives (or black or green if you like those)

NOTE: you might think that dicing the chicken before putting it in the bake will make this easier, but the smaller pieces cook so much more quickly than the rice that they become dry and rubbery. Not pleasant, IMHO.

IMG_2001Preheat oven to 350°F.

Layer rice, water/stock, juice, chicken, salt, and pepper in a 9×9 baking dish in the order listed above for the least messy assembly.

Bake uncovered for 30 minutes. Stir – this is essential for all of the rice to get cooked.

Bake uncovered for 10 more minutes.

IMG_2002Use two forks to shred the chicken. Stir to mix thoroughly with the rice.

Serve with a sprinkle of feta cheese and chopped olives.

LEFTOVERS: if you have any leftovers, they make for a great cold rice salad with artichoke, cucumber, tomato, and sweet onion and a drizzle of olive oil or Greek salad dressing added to the feta and olives. Mmmmm, lunch!

Posted in Being Healthy, Cooking, corn free, gluten free, nut free

PaPa’s Fish Stew from my Grandfather’s Personal Recipe Book

IMG_1993My dad and brother go on a fishing trip every year in August, and brought back some shark that we’ve been wondering how we want to cook. And about a week ago, in a fit of nostalgia, I was flipping through my grandfather Joe Jones’s personal cookbook and came across his Fish Stew recipe, complete with variations for 21-, 15-, 10-, 5-, and 2-gallon batches. I rubbed my hands together and giggled with fanatical glee: PaPa would LOVE shark in his fish stew!

Bonus! This is such a pantry meal since every ingredient is a staple in our family pantry.

As I’m interested in batches for a standard 4-5 person family, I made just a few adjustments, mainly in the liquid ingredients:

  • 3 slices of bacon, chopped into strips or dices
  • 2 medium sweet Vidalia or yellow onions, chopped small
  • 1.5 lbs potatoes, diced (roughly 3 cups)
  • 2 14 oz cans of diced tomatoes (recommend fire roasted with garlic)
  • 2 cups V-8 juice (recommend original or low sodium)
  • 1 cup fish or chicken broth
  • 1/2 cup fish sauce or white wine (but not both)
  • 1/4 cup Worchestershire sauce or soy sauce (but not both)
  • 1/4 cup hot sauce (like Tabasco or Texas Pete)
  • 1 T Old Bay seasoning (or similar)
  • 2-3 lbs white fish (shark and gator work well also)
  • Optional ingredients: shrimp, crab, clams, lemon juice.

IMG_1989In a large stock pot over medium heat, drop in the bacon and onion and let sweat and sizzle for 3-4 minutes, just until the bacon starts to firm up and the onions start to get clear but NOT browned or caramelized.

Add the potatoes, diced tomatoes, V-8 juice, white wine/fish sauce, Worchestershire/soy sauce, hot sauce, and seasoning.

Bring to a boil and simmer for 15 minutes.

IMG_1992Add the fish. Bring to a boil and simmer for 15 minutes.

Use your stirring spoon to break up the fish into smaller pieces. Flakier fishes like catfish and flounder will “melt” into the stew. Sturdier fishes like mahi mahi, snapper, shark, or swordfish will hold up as chunks.

Serve with cornbread or breadsticks or any sturdy bread. Soft breads like croissants or yeast rolls will get gummy and chewy. For this night (photos), I heated some leftover Papa John’s parmesan breadsticks in the oven for 15 minutes on 350°F.

Confession: I HATE tomato juice and tomato soups, which extends to PaPa’s fish stew, but my family loves it. It’s often what we make with any leftover fish from a fry or a restaurant rather than reheating (stinky!) or choking down cold, dry fish.

Posted in Being Healthy, Cooking, corn free, gluten free, nut free, soy free

Easy Spanish-style Sausage and Rice

My best friend has her abuela’s pot for making Arroz con Pollo, but my family is much less discerning of that level of authenticity. Instead, we get close with this flavorful sausage and rice dish.

You’ll need

  • 1 family size package of Vigo Spanish Rice (with seasonings included in the package)
  • 2 lbs cooked link sausage, such as kielbasa, turkey sausage, venison sausage, etc.
  • 1-2 packages of frozen peppers and onions (roughly 1-2 cups of chopped frozen or cooked peppers and onions)
  • 1/2 – 1 cup whole green Spanish olives stuffed with pimentos
  • 1 poblano pepper, diced (optional)

Cook the rice according to package instructions.

While the rice cooks, slice cooked sausage into coins and brown in skillet.

Note: Vigo seasoned Spanish rice is not corn-free. Use unseasoned white or yellow rice and Sazon with Saffron seasoning.

Thaw/steam frozen peppers and onions (with poblano pepper if using) in the microwave. Or, if using fresh veggies, sautee in skillet after sausage is all browned.

Spanish_Sausage_and_Rice.jpg
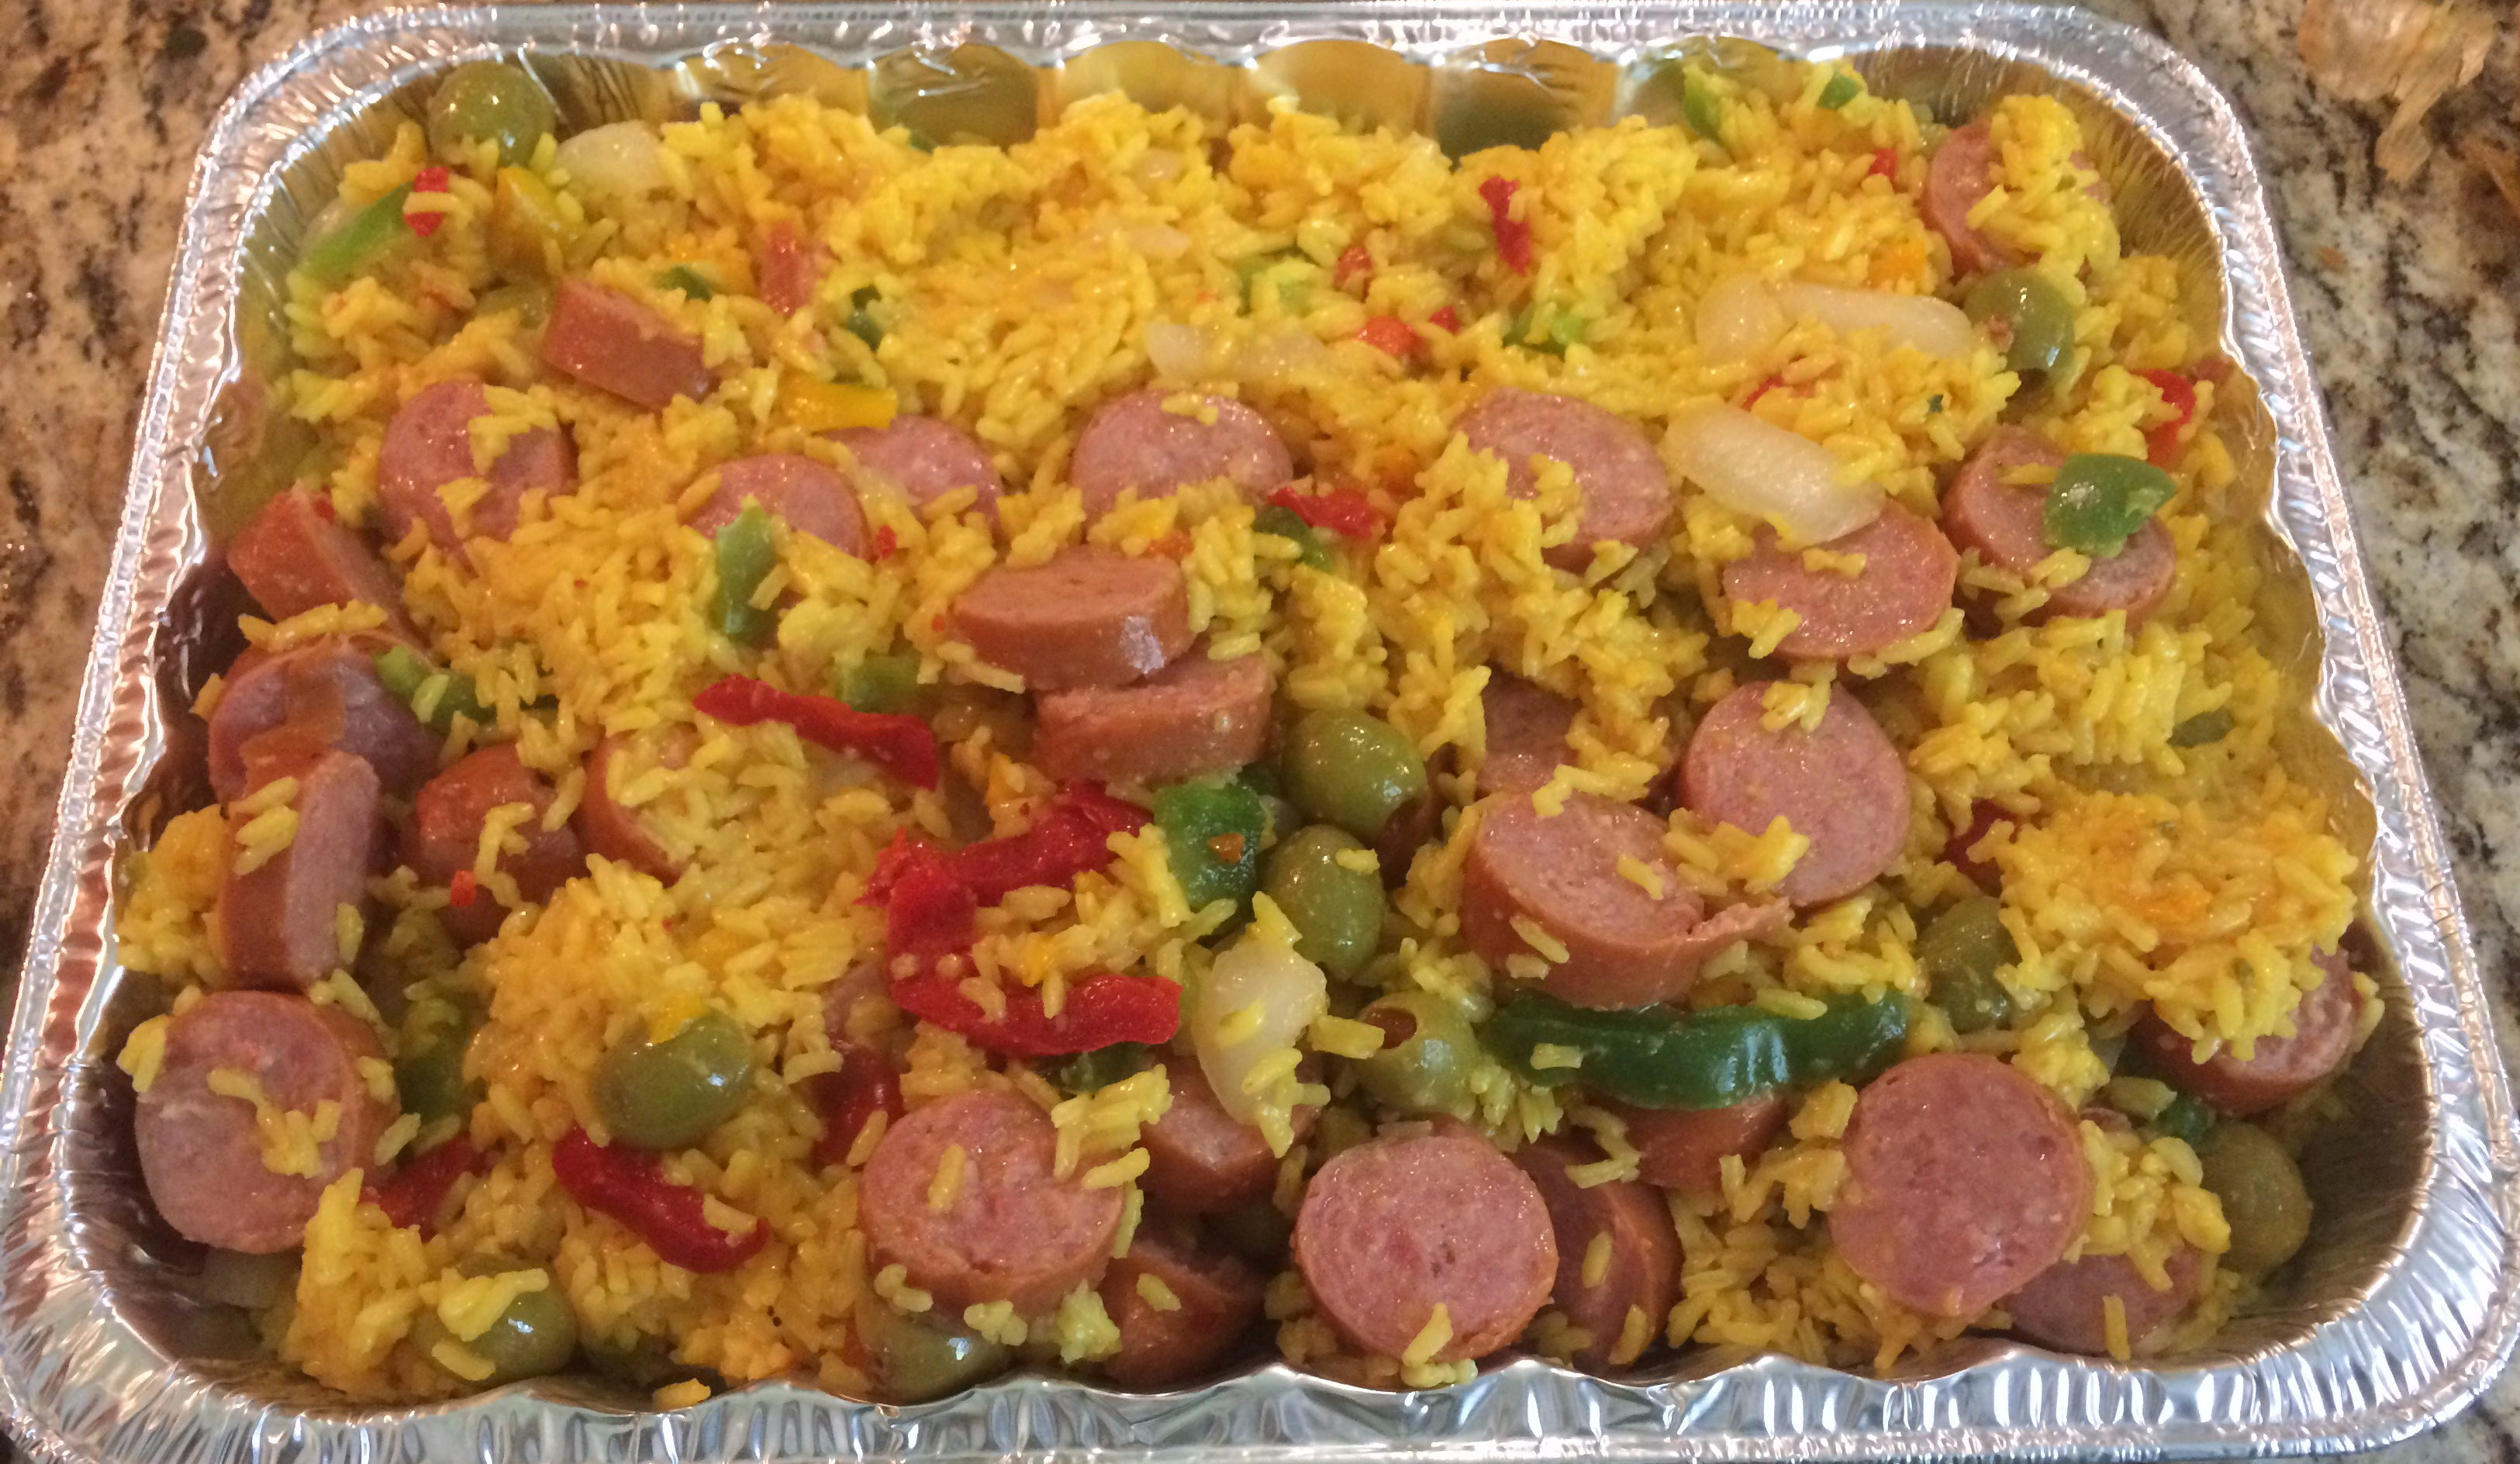
When rice is finished, mix in browned sausage, warmed peppers and onions, and olives. I leave my olives whole because all of my peeps like them; feel free to slice or chop yours up if you need to hide them ;-).

Serve directly from the rice pot, accompanied by fresh fruit salad or seasonal marinated vegetables.

Tip: maintain healthy overnight blood sugar by skipping the “bread on the side” with dinner when you already have rice, pasta, or potatoes. Even non-diabetics can experience unhealthy blood glucose levels when consuming extra complex carbohydrates.