Posted in Cooking, corn free, gluten free, nut free, soy free

Cream of Mushroom Soup

img_1452These days most people have relegated cream of mushroom soup, specifically the thickened condensed version, to casseroles, but I was reminded a few days ago of my love of cream of mushroom soup as a straight up soup, especially with an ounce of brie crumbled and melted into it!

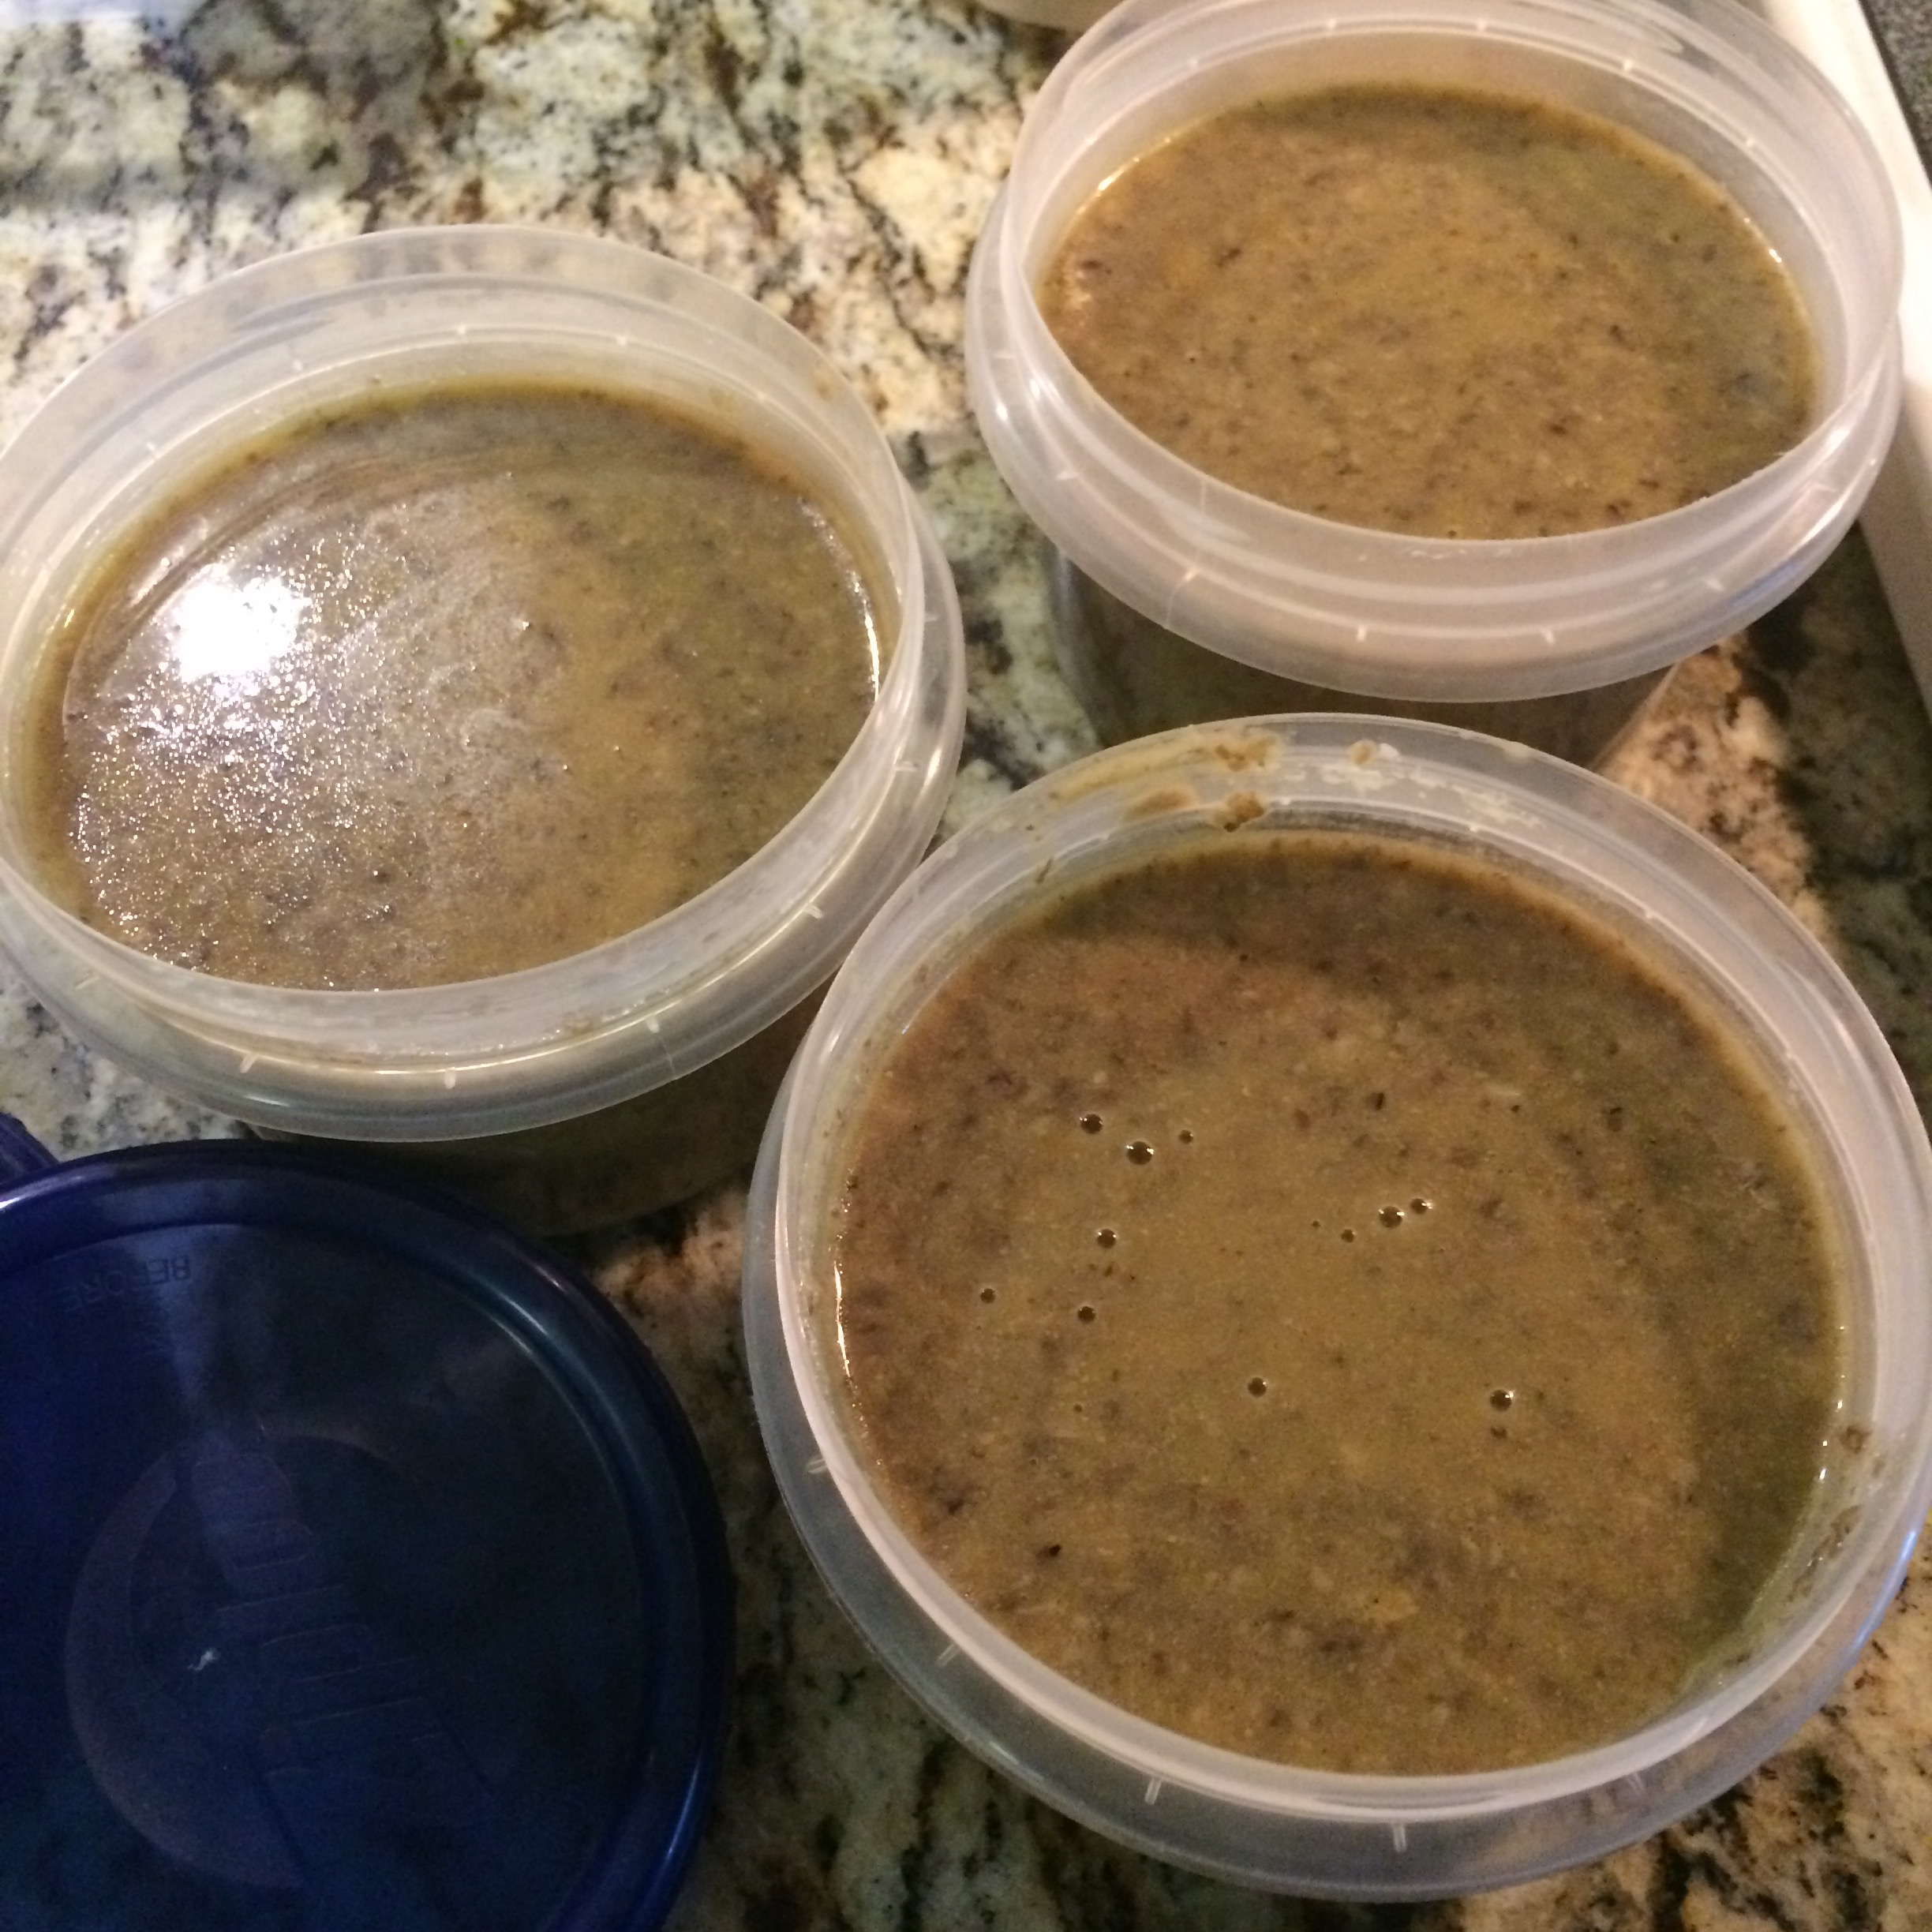
Here’s my gluten free and corn free cream of mushroom soup, which I’ll put up in 1.5 cup servings for freezing.

Makes 4 1-cup servings or 3 1.5 cup servings. The 1.5 cup serving is comparable to 1 can of condensed cream of mushroom soup frequently used in green bean casserole or creamy chicken and rice with peas.

If you’re serving as soup, don’t forget to crumble an ounce (or two) of brie into the steaming hot bowl before serving.

Ingredients

  • 16 ounces baby bella mushrooms (whole or sliced, doesn’t matter)
  • 4-8 ounces of any other mushrooms you like (I add a wild mushroom blend available from Publix)
  • 4 cloves garlic, minced
  • 1/4 cup gluten free, corn free all purpose flour blend (Bob’s Red Mill Gluten Free All Purpose Flour)
  • 1/4 cup of your favorite cooking oil (I use grapeseed oil)
  • 1 cup whole milk or heavy cream (soy and almond milk will produce similar result; rice milk will not)
  • 4 cups mushroom or vegetable broth (I use Pacific Organic Vegetable Broth when I don’t have any or enough of my fresh-made veggie stock)
  • 1/4 t kosher or coarse sea salt
  • 1/2 t black pepper
  • Optional: 1-2 ounces of brie per serving, to be crumbled into the hot soup to melt

Add 1 T of your favorite cooking oil and 4 cloves of garlic to your stock pot over medium heat. You’ll observe the medium setting or you’ll burn your mushrooms and have a bitter soup.

img_1441
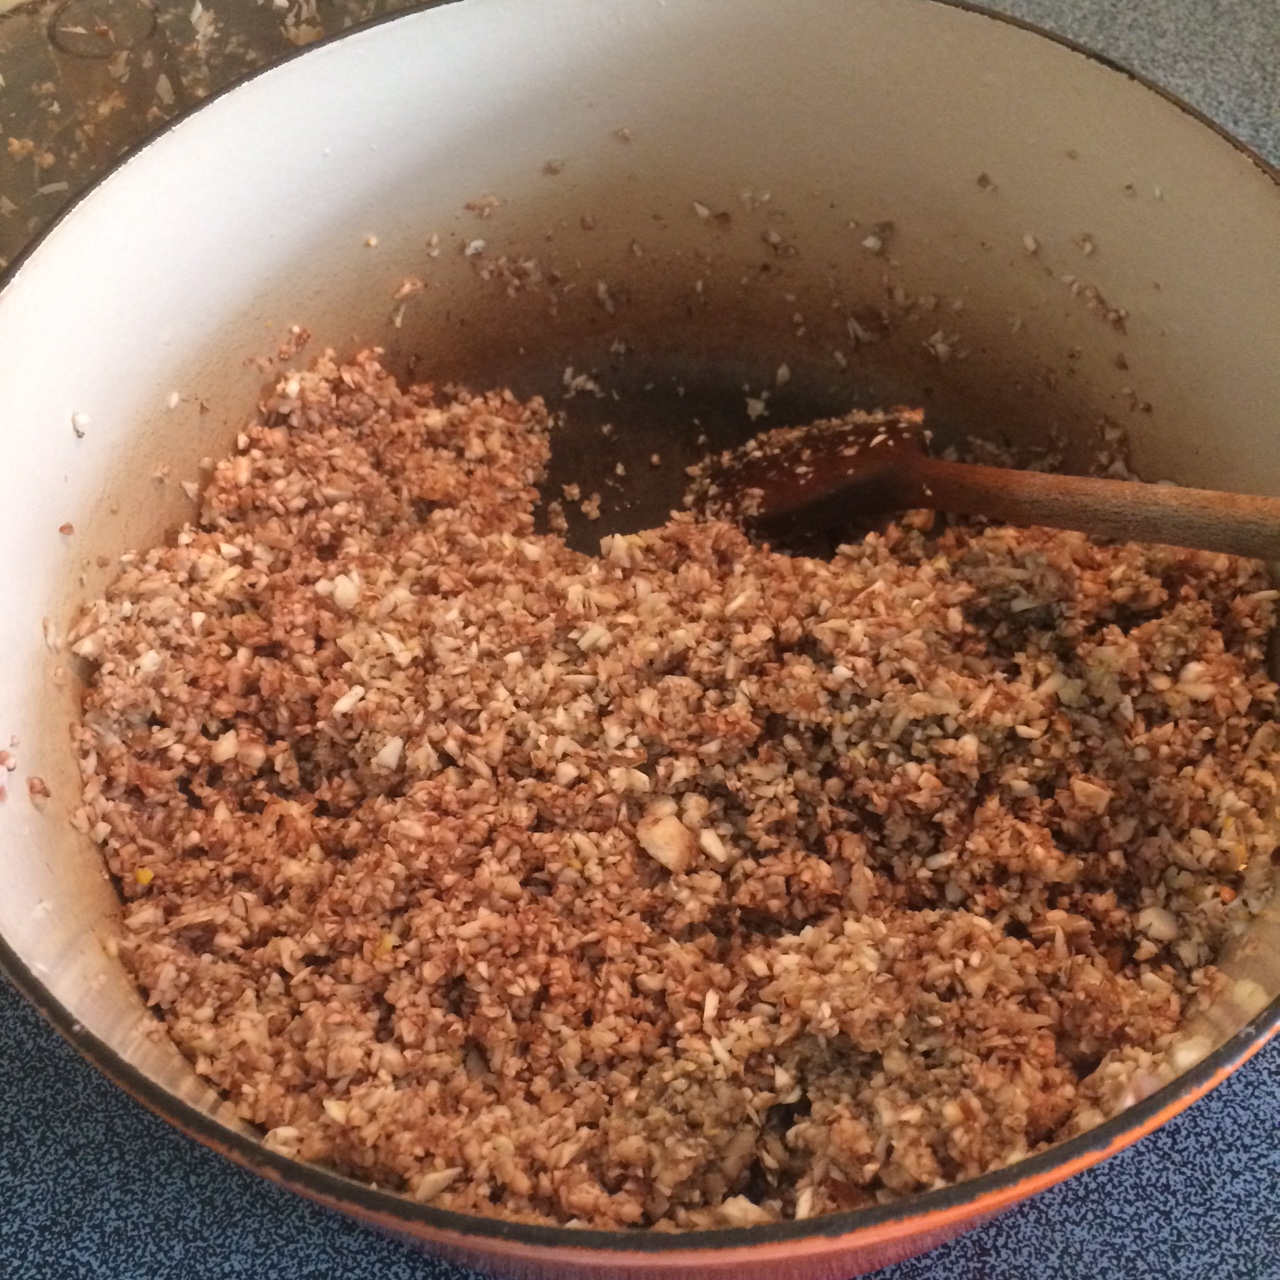
Finely chop the mushrooms in your food processor (Cuisinart). If you don’t have a food processor, borrow one. You’ll thank me after your first hand-chopped or too-big-pieces batch! I find it easiest and fastest to do this in three batches, basically one batch per 8 oz container of mushrooms. Dump straight into the stock pot as you chop each batch.

img_1446Cook the mushrooms and garlic on medium for 15-20 minutes. You’ll see a lot of liquid bubble up out of the mushrooms, and your goal is to get that gone. You’ll both see the dry pan and begin to smell a slightly beefy aroma from the pot. That’s when you’re ready for the next step.

img_1444
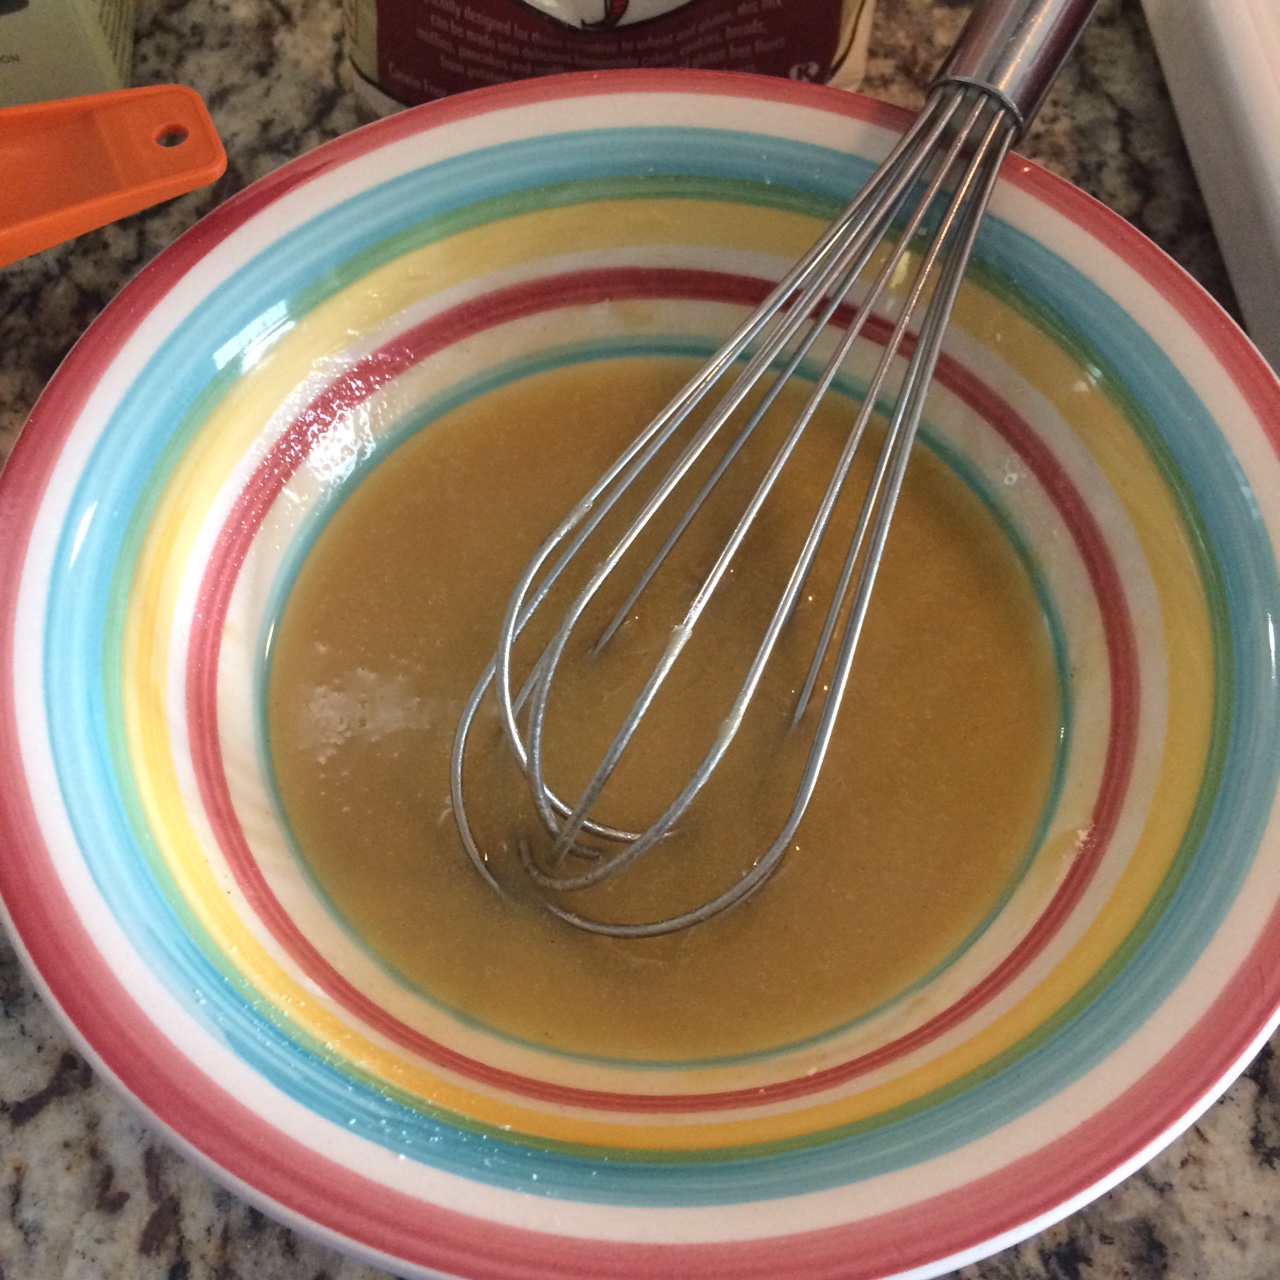
While you’re waiting for the mushroom water to cook all out, whisk together the all purpose flour and the oil; this is roux (pronounced “roo” like kangaroo), used to thicken liquids into thickened broth, cream soups or gravies. NOTE: if you find the first batch not thick enough for you, next time increase both ingredients to 1/3 cup; the more roux you use, the thicker your soup will be.

img_1447
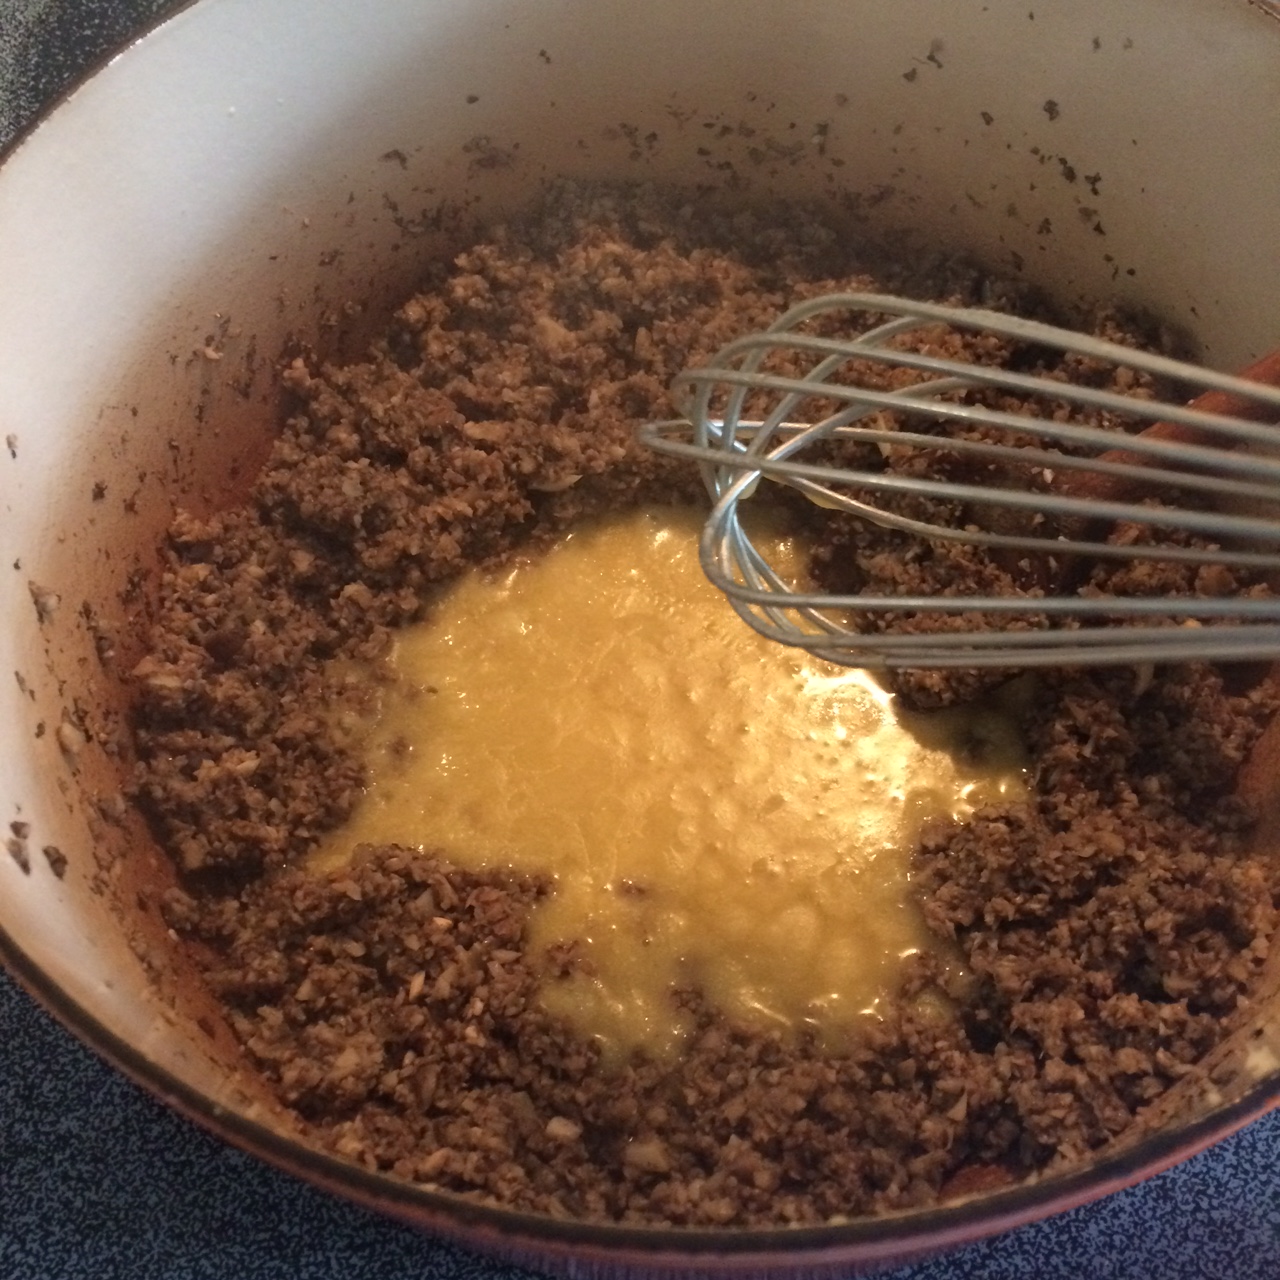
Once you’re sure all of the mushroom water is cooked out, make a hole in the mushrooms and pour in the roux. Let it bubble up for about 30 seconds and then stir it around into the mushrooms. Add the cup of milk/cream and keep stirring. It’ll look a little oatmeally at this point.

img_1449Add your vegetable or mushroom stock by 1 cup portions, stirring to combine before adding the next portion, until you’ve added 4 cups. And since that 32 oz box of stock is 4 cups, you can certainly guess your way through this step and just pour straight from the box.

img_1451Bring everything to a boil and let boil and bubble for about 3 minutes, stirring. Lower heat to the lowest setting you can and simmer for 30 minutes.

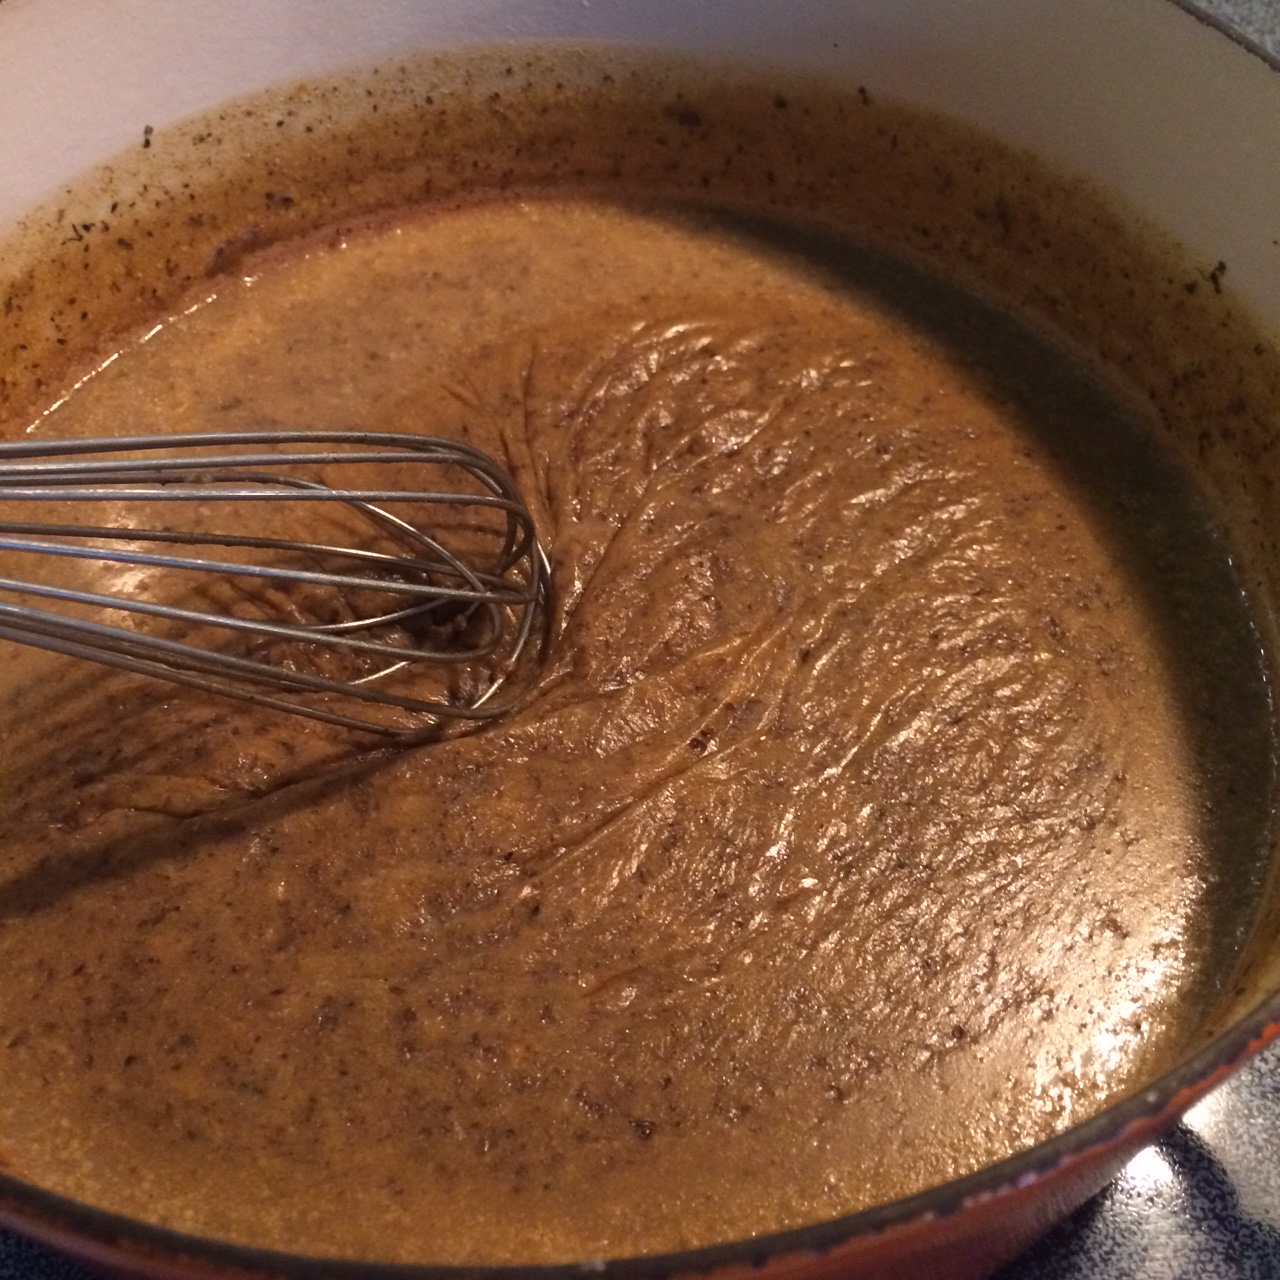
NOTE: If you’re using gluten free flour, you’ll see a “scum” or skin form on top of the soup; this is what happens when you try to get milk fats to combine with flour that has no gluten. Keep the skin; love the skin; use a whisk to re-blend the skin into the soup. This is part of how a gluten free flour thickens liquids when it has no gluten.

Turn heat off, leave the pot on the burner, and let cool before prepping individual servings for freezing or storing in a large container for refrigerator storage.

Posted in Being Healthy, Cooking

Soy and Teriyaki Sauce Alternative – soy free, corn free, gluten free

I’ve got a growing group of friends who have straight up food allergies to corn, gluten, soy – and, Lord help me, all three! And that makes safe store-bought sauces that most think of as a single ingredient not nearly impossible but actually impossible.

Hibachi-at-home: steak, scallops, veggies (zucchini, carrot, onion, peas), rice.
Hibachi-at-home: steak, scallops, veggies (zucchini, carrot, onion, peas), rice – using this homemade soy sauce turned into teriyaki sauce.

Here’s my alternative to soy sauce when cooking for them – and now myself since I can control the sodium level so much more!

  • 1/4 cup strong beef or mushroom broth (use homemade or Pacific brand)
  • 1/4 cup organic apple cider vinegar (make your own with this recipe)
  • 1.5 cups water
  • 2 T molasses – be sure to get organic and check the label for corn syrup or corn-derived additives – I get mine raw from a local farm
  • 2 cloves finely minced garlic – I recommend using a garlic press
  • 1/2-inch of fresh, finely minced ginger – I recommend using a cheese grater
  • 1/4 t finely ground pepper
  • kosher or sea salt – add in 1/4 t amounts until you achieve the soy sauce saltiness you like

Combine all ingredients in a sauce pan and bring to a boil. Simmer for 20 minutes. Cool and store in the refrigerator for up to 6 months.

Did you know that Teriyaki Sauce is nothing more than a sweeter soy sauce? Add 1/2 to 3/4 cups of this soy-free soy sauce to a sauce pan with 1/2 cup corn-free brown sugar, combine well and simmer for 20 minutes.

Posted in Being Healthy, Cooking, corn free, gluten free, nut free, soy free

Comforting Beef Stroganoff Casserole

Recently, I found myself craving something beefy and comforting, so I put out a call for ideas on Facebook. Boy, did my girlies come through for me. Beef Stroganoff. It has a rich history as a classic Russian dish. And wouldn’t you know it, it’s got its own website! But essentially, this dish is beef cooked in a creamy mushroom sauce.

Having spent a delicious month in St. Petersburg, Russia, in 1993, I know that, at least at that time, most Russians didn’t have regular access to good cuts of beef, and I learned that both of my Russian families made their beef stroganoff about the same way: cooking down wild, handpicked mushrooms and onions, adding some beef in to brown, deglazing with some water (making a bit of broth), and cooking this for several hours on low, then adding in some sour cream at the end to thicken up the sauce.

Sounds like the perfect crock pot recipe to me, but I wanted something a little more compact since I’d be at work all day and wanted my family to be able to put dinner together themselves. So I settled on a casserole that achieves the same purpose and delivers 4 healthy servings an no leftovers to junk up the fridge.

Ingredients (in order of preparation)

  • 1/2 bag of egg noodles, cooked and drained (for gluten free and corn free, use Lehman’s Gluten Free Homestyle Egg Noodles)
  • 2 large green peppers, roughly chopped
  • 1 large onion, roughly chopped
  • 8 oz sliced portabella mushrooms, chopped (alternatives: white button or baby bella)
  • 1 lb beef, chicken, or pork (cubed beef is traditional; ground is a great, less expensive alternative)
  • 1 can cream of mushroom soup (for gluten free and corn free, use Pacific GF cream of mushroom soup or my homemade recipe)
  • 1 cup sour cream (or milk if you’re out of sour cream)
  • 1/4 t kosher or coarse sea salt
  • 1/2 t ground pepper

You can see I’ve gone with a little help from the pantry rather than a totally-from-scratch recipe.

So I start with cooking the noodles. When they are drained, pour them into a casserole dish, lightly sprayed with cooking spray if you’re worried about sticking, which is not usually a problem.

Next I move on to the veggies…on medium heat and with 1 t of your favorite cooking oil, sweat the water out of the mushrooms and then add the peppers and onions for a quick saute; I’ve stopped cooking veggies in oil. I do these separate because I want to make sure they keep their crunch. If I put them in with the meat and sauce, they would cook down and have no texture left to liven up the casserole when it’s heated. Before they start getting brown, dump them in with the noodles and give it all a quick stir.

The last part is just as quick. We had some venison stew meat already cut up, so I tossed that into a pan with a little olive oil. When it gets just barely cooked through, dump in the cream of mushroom soup and sour cream, stir, and simmer for maybe 10 minutes, mostly to make sure the sauce comes together. Then dump this in with the noodles, peppers and onions, stir, and viola! Beef Stroganoff Casserole.

Now, certainly, you can pop this in the oven to finish and serve it up in about half an hour.

But I needed this as a make-ahead. And here are the instructions I’ll leave for the family to follow tomorrow:

To have dinner ready to eat by 6:30 pm, start at 5:45 pm

  • Preheat oven to 350°
  • Take the casserole out of the fridge and stir slowly and carefully
  • Cover the casserole with aluminum foil
  • Put the casserole in the oven for 30 minutes
  • Take the foil cover off and put in for another 15 minutes

As I’ve got Harris Teeter brown and serve rolls to go with mine, I’ll add the rolls during the final cook since they take 12-15 minutes. My folks will also be cooking up some sauteed squash and onion to go with this casserole.

For 8 nutritional servings or for 6 fuller servings, double the noodle, beef, and soup quantities; I also fully double the veggies, but that can be too much for many. Do not double the sour cream; there’s no need.

Posted in Cooking

Campstyle Eggs

My dad's favorite dinner for Veterans Day 2016.
My dad’s favorite dinner for Veterans Day 2016.

My dad grew up country and military, so he learned how to make something delicious out of nothing early in the life and from both his momma and his daddy – my Grannie and Papa Joe.

Between camping and hunting, Boy Scouts, and military life all using campfire cooking, a favorite campfire skillet breakfast is born: Campstyle Eggs.

Here’s the proportions for a 4-serving batch, which I made this evening for my Vietnam Veteran dad – Ed Mikell.

  • 1/2 lb breakfast sausage (Jimmy Dean Hot, one of my dad’s favorites)
  • 2 medium potatoes diced pretty small, or equivalent baby potatoes (we prefer yukon gold or red potatoes)
  • 1 small onion diced (sweet for us)
  • 1 small green bell pepper diced
  • 1 clove garlic, minced (optional and not a traditional ingredient)
  • 3 jumbo or 4 large eggs (subs: 1 cup Egg Beaters, tofu scramble)
  • 1 T milk per egg
Prep your potatoes, onions, and peppers before you start; this dish goes fast!

Brown up the sausage on medium high heat, using your wooden cooking spoon to break it up into a fine crumble. Use a slotted spoon to remove the sausage to a paper towel, leaving all of the pork fat grease in the pan.

Drop in the potatoes, stir to coat in the pork fat grease well, and smooth into a single layer. Now leave them alone for a good 2 minutes (if diced really small) or 3 minutes (if diced a little larger) to get a light crispy golden crust on that one side. Stir gently to unstick the potatoes and roll them onto their other sides to continue cooking. I like the really small dice for this dish because you can crisp up the potatoes pretty quickly and get the whole dish done in under 20 minutes.

All the veg in the pan; all the meats waiting for their turn.

Once the potatoes have softened but may still have some crunch or bite to them still, drop in the onion and pepper to begin cooking. If you wait until the potatoes are completely and perfectly done, you’ll end up with half hard crunchy over cooked potatoes and half smushed potatoes, neither of which are desireable in the final dish.

Everything is in the pan, waiting for the eggs!

While the potatoes, onions, and peppers are finishing, scramble 3 eggs with about 2 T milk; be sure to salt and pepper your egg scramble or the eggs will be bland.


I only had 3 large eggs, but this dish is very forgiving of amounts!

When the potatoes, onions, and peppers have reached your favorite level of doneness (takes about 5 minutes for my family), add back in the sausage and stir well. Gently pour the egg/milk scramble over the whole dish and stir gently to coat everything with the egg as it is cooking. It’ll take about 1 minute for the eggs to cook and the dish to be ready to serve.

All done. It's not the prettiest thing, but it's delicious!
All done. It’s not the prettiest thing, but it’s delicious!

As soon as the egg is done to your liking (some like wet eggs, some like rubbery eggs, to each his/her own), take the pan off of the heat. This is important: do not leave the pan on the burner to “keep it warm” or you’ll overcook the egg and begin to burn the rest of the ingredients.

When we have this as a breakfast, this is it. As our dinner tonight, we enjoyed it with some local tomatoes sliced and fresh biscuits with butter and preserves.

Vegetarian/Vegan Alternative

  • Sub veggie crumbles or seitan crumbles for the sausage (will need to use an oil for the potatoes, onion, and peppers)
  • Sub tofu scramble or The Vegg Scramble for the egg
Posted in Cooking

Chicken and Dumplings

Boiled stuff…all together…including boiled dough. Only the countriest of country kitchens in the American South have been able to render boiled dough a culinary delight.

My Grannie's chicken and dumplings, one of my dad's favorites
My Grannie’s chicken and dumplings, one of my dad’s favorites

Many younger and even some middle-aged (like me) Americans believe a dumpling is the original creation of the Asian cuisines: a little pocket of dough filled with something. They seem to focus on the filled part and ignore the boiled part.

You see, country people got stuff to do. They don’t have time to roll and cut the dough and fill it with the chicken and vegetables from the stock before boiling it. But at the very root of things, country American chicken and dumplings are arguably a deconstructed Wonton soup. Hmmm, so it really is all in the presentation.

For me, I’ll stick with ugly yummy classic American chicken and dumplings:

Step 1: boil chicken and make stock – these things happen simultaneously

It’s important any time you are making a chicken stock or chicken soup that you use skin-on and bone-in chicken and that you use both white and dark meat. Why? That’s where the flavor lives: in the fat and in the bone. I promise that leaving the skin on will not make your stock oily, only that using the most flavor-filled parts of the chicken will make it rich and dark stock. That’s what you want: not golden or yellow but a light to medium brown color!

  • 1 whole split chicken (ask your grocery store butcher to do this for you or buy 2 split breasts and 4 split thighs with skin and bones)
  • 4 large carrots, cut however you want (I like 1-inch barrels) or half a bag of baby carrots
  • 1-2 onion family choices: white or sweet onion sliced, leek or green onion chopped to 1 inch pieces
  • 3-10 cloves of garlic – depends on how many vampires you’ve got hanging around
  • salt and pepper
  • hot water to cover the chicken completely

Turn on the sink faucet to the hottest setting to let it get hot. In the largest stock pot you’ve got (at least 8 quarts), place your carrots and onions and garlic on the bottom. Place the chicken pieces on top of this; smush it all down well. Liberally salt and pepper the pot, roughly 2 tablespoons of each; yes, it really needs that much salt. Cover with hot water from the kitchen sink, probably to about 1 inch from the top of the pot.

Place the full stock pot on your large burner on high. It’ll take 20-30 minutes to come to a full boil; be patient. Let it roil for 3-5 minutes, and then turn it down to medium low to simmer for 2-3 hours. You want to see a tiny bit of movement on the water; it should not be completely still. Turn the burner off and get ready for step 2.

Once you remove the chicken for picking (step 1), you may find that your stock fills only half of your pot. If you’ve followed my flavor instructions and your stock is a rich medium or dark brown, add up to 4 cups of hot water to dilute the stock for direct eating. I often have 2-cup servings of frozen stock in the freezer and may add one of these as well; my freezer stock is actually broth with much more vegetables and already diluted for immediate eating.

Step 2: Cool and pick the chicken

Using a slotted spoon or tongs, remove the chicken from the pot. I usually place mine in a colander so that it gets good airflow for quicker cooling. Once cooled, pick the chicken.

What, you don’t know what that means? Truly I know a lot of people who don’t know how chicken gets from pieces to shredded. Before you get started, make sure you have a chicken plate and a discard plate; I use paper plates for this step. So here’s how it goes:

  • pick up a piece of chicken in your right hand (reverse the hands if you’re left handed)
  • use your left hand fingers to grasp the chicken skin and fat flabs and pull them off; place them in the discard plate or bowl. Generally breast pieces will have less skin and fat than thigh/leg pieces
  • switch the piece of chicken to your left hand
  • use your right hand fingers to pull the large chunks of chicken off of the bone and place them on the chicken plate; discard the empty bone to the trash plate
  • take up the large chunks in your left hand
  • using a pinching motion, use your right hand fingers to pinch and tear the large chunks into many smaller ones
  • continue until you have picked all of the chicken off of all of the pieces

Now some of you reading have already rolled your eyes and dubbed me patronizing to be so specific, but I’ve had the pleasure of teaching my same-aged friends and their children cooking basics, and you can’t even imaging how difficult it is to employ these basic motor skills for the first time as an adult.

NOTE: some folks also remove the vegetable flavorings, but I like them so I keep them. Other traditional vegetable additions include celery and peas (see side note at the bottom).

When you’re about 30 minutes from serving time, you’ll take step 3.

Step 3: Make the dumplings

There are lots of styles of dumplings, but the dough is about the same. If your people have memories of fluffy round dumplings, you’ll want to keep the following dough pretty wet and sticky; these are biscuit dumplings. If your people have memories of long flat dumplings, you’ll want to add a little more flour to form a solid ball of dough to work with; these are pie crust dumplings. The basic recipe is the same:

  • 2 cups all purpose flour (make this gluten-free by replacing standard flour with Bob’s Red Mill Gluten-Free All Purpose Baking Flour)
  • 1 t baking powder
  • 1 cup chicken stock
  • 1 egg

Drop them all in a bowl together and use a fork to blend them; do not use a whisk or you’ll end up with a blob of unblended dough inside the tines of the whisk and it’ll be a pain to get it all out.

If you want the puffy biscuit dough dumplings, stop mixing as soon as everything is combined. Drop the dough into the boiling stock. Since dumplings cook through in about a minute, this is a fast process.

If you want the flat pie crust dumplings, keep dusting the mixture with flour (probably 2 T at a time) and mixing until the dough comes together into a ball that does not sag or flatten and the sides stay smooth when you tough them, not sticky or tacky. Sprinkle a handful of flour on your clean kitchen counter and coat both of your hands with flour. Pinch off a generous handful of the dough and, on the floured counter, use your fingers to press it into a long flat lasagna noodle shaped dough. With a sharp knife, cut the dough into 1 inch strips on the short edges (1-inch x 2-inch). Peel the dough strips off of the counter one by one and drop them into the boiling stock. Repeat until all of the dumplings have been dropped.

Add the picked and shredded chicken back into the stock and dumplings to warm for about 20 minutes. Serve piping hot!


Side Note: One of the most beautiful things about this recipe/technique is that it’s almost a chicken pot pie. Yep, use the same stock making, the same dumpling making, and use the stock to make the pot pie sauce. Really couldn’t be simpler.

Posted in Being Healthy, Cooking

Basic Granola (technique and recipe)

My mom is diabetic. And even though her dad was diabetic her whole life, and she was raised essentially on a diabetic diet (as it existed in the 60s and 70s), she’s got very diabetic-unfriendly eating habits.

img_11401But one good choice she craves and sticks to is granola. The oats are a great carb choice for diabetics, a slow digesting carbohydrate whether eaten cooked or raw. She loves oatmeal during the winter months, but really needs to have the sweet bite to it. She loves yogurt, but really needs to have a sweet bite to it. She really (psychologically) needs the sweet or she feels like she’s deprived.

But she won’t buy granola from the store because it’s saturated in various sugars: brown sugar, honey, corn syrup, maple syrup, and more.

Thus is born our experiment, beginning with what I consider Basic Granola.

And like so many “recipes,” this is a system, not a by-the-numbers or it’s wrong kind of food.

So here’s my system – which tracks pretty closely with the vast majority of granola “recipes”:

  1. 1.5 cups oats
  2. 1 cup nuts – mix as many as you like into the blend, but only 1 cup total
  3. 1 cup dried fruit – mix as many as you like into the blend, but only 1 cup total

Yep, it’s that simple.

Now, for the recipe people, here’s exactly what’s in my Basic Granola pictured here:

  • 1.5 cups rolled oats (Publix brand, no need to go fancy)
  • 1T dried ground cinnamon (Publix brand)
  • 1t dried ground nutmeg (Publix brand)
  • 1t salt (Morton’s)
  • 1 cup water

Mix these five items together in a bowl, cover and let sit in the refrigerator overnight.

Prep your nuts; I used what I already had in the cupboard:

  • 1/3 cup sunflower seeds (Publix organic unsalted from the produce section)
  • 1/3 cup hemp seeds (Manitoba Harvest Hemp Hearts)
  • 1.3 cup slivered almonds (Mariana from the Publix produce section)

Prep your binding; because my granola places emphasis on being diabetic friendly, I have limited sugar to a functional role and eliminated all granular sweeteners – natural or artificial:

  • 1/3 cup honey (from a local farm near me)
  • 1/4 cup oil or melted butter (Pompeiian Grapeseed Oil)

When you’re ready to bake, mix the nuts and the binding into the softened oat mixture. Spray or grease a medium or large cookie sheet with at least a little lip, spread the mixture in a thin layer in the sheet. Bake at 250° for 1 hour and 15 minutes; increase heat to 300° for 20-40 minutes more. The longer time is especially useful in high-humidity climates or times of year.

As your mixture sits to cool, it will harden into the crunchy texture most people are looking for, so don’t get frustrated if it doesn’t harden while still in the oven. It won’t, and you’ll risk overcooking or burning your granola.

Serving Ideas: the standard serving is 1/4 cup

  • cooked oatmeal topper (tip: prepare half of an oatmeal serving and add 1/2 cup granola to finish out the meal)
  • yogurt mix-in
  • ice cream topper
  • fruit pie topping (instead of crust)
  • blend into smoothie for an oatmeal smoothie
  • sweet potato casserole topping
  • roasted root veggies topping

My mom is really happy with this batch and can’t wait for my Christmas blend using pistachios and dried cherries.

Posted in Being Healthy, Cooking, corn free, gluten free, nut free, soy free

Butternut Squash Bliss

This weekend, my friend Sarah offered me her entire crop of butternut squash…because she didn’t know what to do with them. Sarah, you don’t know what you’re missing! This delicious squash has a simple, light, nutty butter flavor of its own but also provides a wonderful base for sweet or savory additions.

As we are on the cusp of Fall and the morning and evening temperatures are cooling, I’m ready to start on soups, and butternut squash soup is hands-down my favorite! Luckily it’s also the one I can’t seem to screw up despite the fact that I don’t measure…ever!

Here’s what you’ll need for my savory version of the soup:

  • Butternut squash: peeled, seeded, and diced
  • Sweet onion: peeled and quartered
  • Carrots: cleaned and chopped
  • Garlic: one whole pod peeled (not one clove, but the whole pod of 10-12 cloves)
  • Stock or Cream: up to 8 cups, depending on your preference
  • Spices: Salt, Black Pepper, Ginger, Cumin, Coriander Seeds

Get all the veggies cleaned and cut. I usually do this while watching a movie, a method I “developed” from my days living in a tiny Brooklyn flat with no kitchen counters. If you’re using fresh ginger, peel, dice, and add that to the roasting mix.

Spread them all out on cookie sheets, making sure everything is in just one layer. Dust with salt, pepper, and spices; use as much or as little as you like. Roast at 400°F for 45 minutes. Turn off the oven and let them sit for another 15 minutes.

Dump all the veggies carefully into a large stock pot. Here’s where I’ve got to talk you through some options.

Option 1: Stock or Cream

The difference between a soup or a bisque is the use of stock or cream as your thinning or thickening agent. There are a few other options besides cream for a bisque, but that’s the traditional one. Vegans can choose vegetable stock or soy or rice milk. For the least flavor interference, use homemade vegetable or chicken stock. For a richer, velvety flavor, use beef stock. For the sweeter version of this soup, use ham or veal stock. And you can always use just plain water, especially if you are looking for a thicker consistency and not worried about having to use too much.

Option 2: Blending Method

If you’ve watched chefs on cooking shows make soup, you’ve seen the two methods: blender or immersion wand. Both can achieve the same level of smoothness, but the traditional blender will get you there faster; just make sure the veggies have cooled to room temperature before using the traditional blender. Me, I like the convenience of the immersion wand because I can pretty much put all of the veggies in at one time and both see and feel the consistency as I’m blending; it offers a level of control that you don’t get with the traditional blender.

I like my soups with a strong “mouth feel,” which usually translates into thick or stew-like. I know it makes the blended soups look like baby food and/or baby poo, which, by the way, reminds me to tell you that this is exactly how to make your own baby food; studies show that children who eat the same food and same seasonings in their baby food as their parents have on their plates aren’t as picky during their formative years, making meal time much easier to deal with.

When my Mom insists on the sweeter version of this soup, it goes something like this:

  • Butternut squash
  • Carrots
  • Onion
  • Cream
  • Ginger, Nutmeg, Cinnamon, Brown Sugar (during blending)

This version comes out similar to sweet potato soufflé (aka sweet potato casserole) with Thanksgiving spices and sweetness. I just don’t happen to like that very much.

Note for Sarah: other ways I use butternut squash:

  • Oven or deep fried fries…similar to sweet potato fries
  • Winter Veggie Salad with b. squash, zucchini, carrots, onions (or mix with orzo or rice or risotto)
  • Mashed butternut squash
  • Ravioli or Lasagna filling
Posted in Being Healthy, Cooking, corn free, gluten free, nut free, soy free

Greek Penicillin–Greek Lemon Chicken Soup

There’s this new local soup and sandwich shop Ladles in Sweetgrass (the new Harris Teeter off Hwy 17 N) that serves up a fantastic Greek Lemon Chicken Soup…not tart, but fresh lemon flavor, hint of garlic, and just oh so comforting…even in the hot Lowcountry summer, which has gotten an early start.

But it’s not always convenient to go get it. And I needed something to make for my lunches this week that would make a little extra for one of our dinners. And…I’m a soup fanatic. Love it….hot or cold weather…but not really many cold soups.

So…what makes Greek Lemon Chicken Soup special? Well, to tell you the truth, it’s basically homemade chicken noodle soup with a special touch right at the end. Here’s how it goes.

Ingredients:

  • 6 large chicken breasts, skinless and boneless (about 4 lbs)
  • 64 oz (8 cups total) chicken broth (homemade is best; for corn free, use Pacific Organic Free Range Chicken Broth or Harris Teeter Organic Chicken Broth)
  • 4-6 large carrots, cleaned and roughly chopped
  • 1-2 large sweet onions, roughly chopped
  • 3-5 cloves of garlic, roughly chopped
  • 2-3 bay leaves
  • salt and pepper as desired
  • 2 cups Israeli couscous (little tiny pasta balls)–or 2 cups white rice which is more traditional and naturally gluten free
  • 3 eggs
  • juice and zest of 2 large lemons (alternate: 1 cup lemon juice)

Place the chicken, carrots, onions, garlic, bay leaves, and salt and pepper in a stock pot; cover with 32 oz of chicken broth (about 4 cups). Bring to a boil, then cover and simmer for 30 minutes. This is to cook and flavor the chicken.

Remove the chicken and add the couscous and another 32 oz of chicken broth (about 4 cups). Cover and simmer while you shred (or chop) the chicken.

Add the chicken back in and stir well.

At this point, you have a fantastic and well-flavored Chicken Noodle Soup…and might very well choose to stop here.

Or…you can make and add the “Greek” part.

Whisk together three eggs and the juice and zest of two large lemons (about 1T zest and about 1/2 cup juice) in a large bowl. Be sure to use a large bowl, much larger than you think you need, because next you are going to add 2 cups of soup broth while whisking.

Get 2 cups of hot broth out of the soup pot; it’s okay if there’s some onion or couscous in it. I dip the broth out with a soup ladle and into a large measuring cup with a pour spout. This will come in really handy as I pour it into the egg mixture.

Now, take the measuring cup of broth in your left hand and your whisk in your right hand (or vice versa if you are left-handed).

Start whisking away gently.

Dribble the hot soup broth into the egg mixture very slowly, whisking the whole time.

It will take about five minutes, so be patient and DO NOT rush this  step. This is called “tempering” the eggs, warming them up without cooking them so that when you add the mixture to the soup, it will become naturally creamy from all of the proteins!

When you’ve incorporated all of your broth, take the soup off of the heat and add the mixture to the soup. Taste and see what you think.

If you want more lemony taste, add some more lemon juice.

NOTE: this recipe is based off of one posted by Whole Foods for Greek Lemon and Chicken Soup.

Posted in Being Healthy, Cooking

Super-simple Sloppy Joes (and a tiny soapbox moment)

I have a love-hate relationship with sloppy joes. I do love the flavor, but there’s a soupiness threshold for me. Sure, it’s easy to buy a can of Manwich or some other pre-made sauce mix, but I think when you know what the sauce basic are, you just might want to try your own.

Brief Soapbox: The key reason I object to canned sloppy joe mix is that they all use corn syrup because they are tomato-based. I’m on a less-traditional bandwagon against corn syrup–and I don’t really care if it’s high- or low-fructose. First, why in God’s name does tomato sauce need sweetening? If the tomato is picked at the peak of ripeness, rather than forced into ripeness chemically, then they wouldn’t be bitter when cooked. Second, like milk allergies 15 years ago and nut allergies 10 years ago, the newest mass produce allergy is to corn; while research is too young to be conclusive, the prevailing medical, biological, and horticultural opinion is that this is because these products/industries are the first and largest to move into GMO production.

Okay, lesson over…for now.

Aside from that, don’t you want to be able to control the flavor of your sloppy joes! All they are is ground meat, tomato sauce, tomato paste, Worchestershire sauce, and seasonings. Sure, you can add other stuff like onions, peppers, tomato chunks, heat, etc., but that’s the basic recipe.

Ingredients (in the order they’ll go in the pan)

  • 1 lb ground meat–whatever you like, but tonight we have turkey
  • 1 clove garlic
  • 2 cups of tomato sauce (about 1 can)
  • 2T of tomato paste (often contains corn syrup so steer towards the international tubes of tomato paste like Amore)
  • 2T Worchestershire sauce (make your own GF/CF/SF with this recipe!)

After that, whatever you add is essentially your personalization of the basic sloppy joe:

  • green peppers
  • diced onion
  • crushed or diced tomato
  • chilis
  • bbq sauce
  • honey
  • any variety of spices

Serve this delicious concoction on a hamburger bun (traditional) or in a hot dog bun (practical). We are especially fond of eating them with a whole green onion. And tonight, our sloppy joes are paired with tater tots and fresh cooked green beans.

Posted in Being Healthy, Cooking

My Favorite Summer Pasta Salad

It’s summer, which for many means that all the best produce is in season, fresh, and readily available. Definitely true for all of the ingredients of my favorite summer salad.

It couldn’t be any simpler or take any less time or effort…and you’ll find it very versatile:

  • 1 package of your favorite shaped pasta, cooked, drained, and cooled (try an all-rice pasta for gluten free and corn free needs)
  • Equal volume of your favorite medley of fresh veggies (equal volume to the cooked pasta)
  • Seasoning: salt, pepper, thyme
  • Olive oil, about 1/4 cup for the whole salad
  • Lemon juice, or other acid like apple cider vinegar (to keep some of the veggies from turning brown)

Me…this week I’ve paired rotelle (spiral) pasta with what I think of as my classic medley: 1 pint of grape tomatoes, 1 large hothouse cucumber (seeded), 1 orange bell pepper, 1 red bell pepper, and 2 small Hass avocados. I love how the avocados, regardless of how firm they are when you cut them, start to “melt” and become part of the dressing, keeping everything nice and lubricated without extra oil in the dressing! And I went with 2 T of herbs de provence to season everything nice and brightly…it’s the lavender flowers that I love best in the American version from Whole Foods.

Some alternative combos:

  • artichoke, orange, red onion with red wine vinegar
  • broccoli, cauliflower, shelled sugar snap peas with grapeseed oil

Sometimes I add a small bag of edamame, organic and non-GMO, if I don’t have any regular protein to go with it (either freshly made or leftover). But this week, I’ve cooked up several chicken breasts with herbs de provence.

The chicken, salad, and a banana will comprise my lunch for the week…all made in about 30 minutes.

But this salad is fantastic to make up on a Saturday or Sunday afternoon and just have in the fridge as a quick side or even late-night snack. With the sweet and crunchy veggies, it’s often an acceptable alternative to your palate’s oreo craving at 10:30 pm.

Finally, this is my regular go-to contribution to any summery potluck, especially if I know any vegetarians will be attending; I make a special point to let them know I will be bringing the salad and how I prepare it so they can be comfortable eating it. I’ve had several vegetarian friends attend a potluck for the first time because they knew there’d be something for them other than just what they brought. (In the winter, I do a mushroom risotto for my vegetarian friends.)